
Using a microsite can be an effective way to update your online identity. However, this does not necessarily mean that it is a widely known concept. If you are asking yourself, “What is a microsite?” you are not alone.
Fortunately, the answer may be simpler than you think. By familiarizing yourself with microsites and how they can benefit your brand, you can begin to take advantage of these useful tools.
In this article we will explain what a microsite is and cover some reasons why you might want to use one. We will also cover some key features of a successful microsite and show you how to create one in WordPress in five easy steps.
Let’s get started.
Table of contents view
What is a microsite?
Let’s start with the basics: what is a microsite? To put it simply, it is an independent extension of your site. It does not share the same URL and may not even share the same brand.
However, although microsites exist separately from the main domain, they are not completely disconnected. They usually support the main nrand in various ways.
Some examples of microsites include:
- New marketing campaign promotions
- Hubs for testing new site technology
- Platforms for similar but distinct content
Also, it is worth noting that microsites are not the same thing as landing pages. Landing pages usually focus on a single purpose and are always on the main domain.
Why you might want to create a WordPress microsite
There are a few reasons why you might consider launching a WordPress microsite. First, it can help you focus on achieving a specific goal.
For example, imagine you want to promote a single product line. A microsite can track its success independently of the rest of your content.
Alternatively, you may not always want to link a site back to your brand. If you plan to test new stand-alone content before integrating it, a microsite helps you do so in an isolated environment.
Finally, microsites can also boost ‘search engine optimization (SEO) . This is because having a microsite increases your opportunity to include relevant keywords in the URL. This means that you can leverage these search terms to increase the visibility of your brand.
Fortunately, a microsite is also fairly easy to create. Therefore, you don’t have to worry about spending too much time or resources on it: taking advantage of this tool can be as simple as it is beneficial.
The main features of an effective microsite
We have seen some reasons why you might want a microsite. However, not all microsites are equally effective. You will probably want to be sure that certain elements are in place before you start your version.
Let’s use a couple of microsite examples to illustrate what you might want to target. We can start with Open , a New York Times microsite, which explores the design and creation of digital site projects:

First, branding is a crucial element of this microsite. Open mimics the classic black-and-white palette of the New York Times. However, the lack of any color allows it to stand out from its parent site.
Moreover, this difference also helps with targeting. People who target the New York Times for news may not want to see digital marketing information. Therefore, the Open microsite can serve as a home for this distinct content. In this way, it can focus on attracting a specific target audience.
So, let’s switch examples and look at The data found below . This is a microsite presented by Lucidworks :

This microsite takes a different approach: it brings to life a single infographic instead of serving as a hub for different content. Besides the interactive explanation, there is no other substance on this page.
Lucid highlights this focus with a long page. You don’t have to click on anything-you just have to scroll. This simple navigation tool makes using the site as easy as possible.
Another element you might want to imitate from this example is the in-depth focus on a single topic. Stand-alone content can then serve two types of visitors: those looking for specific information and those who find the microsite through the main site.
How to create a WordPress microsite in five easy steps
Now that you know what a microsite is, let’s talk about how you can easily create your own microsites with WordPress .
With the WP Landing Kit plugin , you can use a single WordPress installation to power an unlimited number of microsites.

If you already have a WordPress site , you can install the WP Landing Kit plugin to use your existing WordPress installation to create a microsite with its own separate URL/domain name.
Or, if you do not yet have a WordPress site, you can create a new WordPress installation to serve as the home of all your microsites. Remember, with WP Landing Kit, you will still be able to assign each microsite its own unique domain name.
Here’s how it works…
Step 1: Aregister a domain or subdomain.
First, you have two options for the URL of your microsite: a new domain or a subdomain. In either case, your choice will need a separate address.
A new domain name allows you to create a unique site. Visitors may not even know it is related to your brand. If it sounds interesting to you, it might be worth buying.
There are dozens of providers where you can register a domain name . We recommend using the same service as your original domain to simplify the process, but it is not necessary.
The other option is to acquire a subdomain. Subdomains are spin-offs of your current one. They share part of your domain but have a separate start.
We recommend a subdomain if you want to establish a clear connection to your main site. This way, visitors can recognize your brand regardless of how they found your microsite.
Once you have chosen what you want to name your microsite, go ahead and register your domain name. If you plan to add a subdomain, you will need to do so through your main site.
Step 2: Plan the content and design of your microsite.
Before we go any further, let’s talk about your content. The most effective microsites are created with clear intentions in mind. This means you will likely need to spend some time developing your content before launch.
Consider starting with a question: why do you want a microsite in the first place? Do you want to promote a single project or explore a new design before using it on the main site? By understanding your main goal, you can more effectively decide what steps to take.
After that, consider how much you want to connect the microsite to your brand. Consistent design can help visitors quickly understand the relationship. In any case, if you want an independent project, you might focus on a completely new approach.
So, we recommend that you consider the history of this microsite. If you want to create a long-term project, you might plan a content calendar in advance. This tool can help you populate the page from the beginning and maintain consistency in the future.
However, you might aim for a single-function microsite. In that case, we strongly recommend finding ways to promote it while it is most relevant. Consider some strategies such as:
- Collaborate with other websites
- Writing a companion article on your main site
- Optimizing your microsite for SEO
Check that you are ready to go. Then, move on to the next step.
Step 3: Create your microsite content.
To create the content of your actual microsite, you can create a new WordPress page on your site ( Pages → Add New ).
To design the content of the page, you can use the native WordPress block editor or your favorite page builder plugin . It’s totally up to you.
If you want your microsite to have multiple pages, you can repeat the process to create multiple pages and link them together.
For now, your microsite pages will appear under the domain name of your WordPress site. Don’t worry because you will fix this in the next step by mapping the domain or subdomain you chose in the first step to your new microsite content.
Step 4: Map your domain
Next, we will look at the more technical aspects of creating your microsite. You can start by adding your new domain to your WordPress account using WP Landing Kit .
After adding your microsite content as one or more pages, go to Domains → Add New to start the domain mapping process:
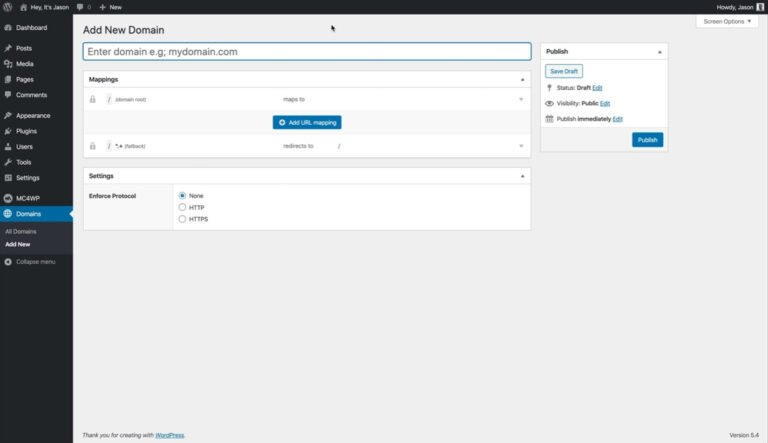
From here, type in the domain you wish to add. Next, expand the Mapping section and click Map to Resource .
Then, select Single Page and type in the title of the page you wish to use as a microsite:
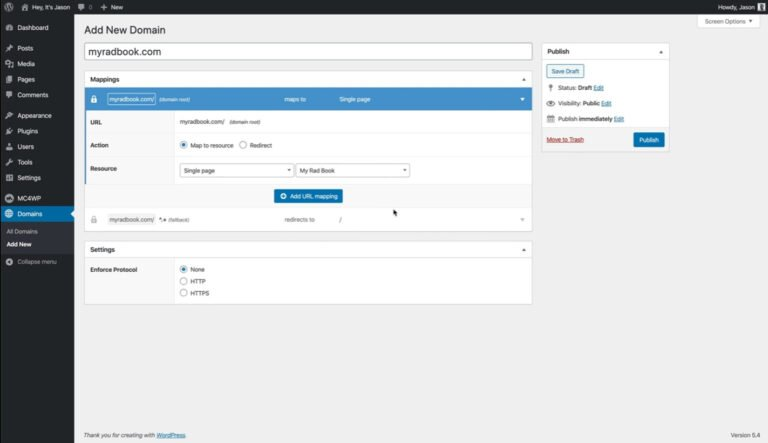
You can repeat the process under the first section to add more pages to the new website. When you are done, click Publish and go to the final step.
Step 5: Update your DNS records.
Finally, you will need to update your DNS records with your hosting provider. DNS records allow browsers to find your site.
You will need to update your DNS records with the provider where you registered your domain name. This could be your hosting provider if you registered your domain name through your host. Or it could be a dedicated domain registrar such as GoDaddy, Namecheap, Google Domains OVH and other popular options .
The exact process will depend on where you registered your domain name, so we recommend consulting your host/registrar’s support documents if you need help.
However, there are some basic steps you can reasonably expect in most services.
Create your first microsite in 2022.
From better SEO to more targeted content, microsites can offer you a wide variety of benefits. Fortunately, setting one up is not complicated. By carefully preparing your design, you can start reaping the benefits of your new microsite.
In this article, we showed you how to create a microsite with WordPress in just five steps:
1.Acquire the desired domain or subdomain.
2.Carefully plan the content for your microsite.
3.Add your content as WordPress pages.
4.Map your domain using WP Landing Kit .
5.Update your DNS records with your hosting provider.