WordPress pingbacks and trackbacks: what they are and why to disable them

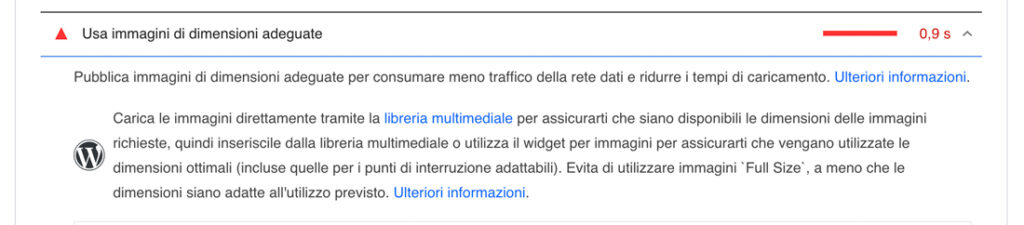
If you are a perceptive user, you may have noticed a setting in your dashboard related to WordPress pingbacks and trackbacks. In any case, chances are good that you have no idea what these techniques are or why they are controversial.

Simply put, pingbacks and trackbacks are technologies that notify other websites when content has been posted that their users might find interesting. While that sounds pretty good in theory, there are also a number of downsides to using both strategies, which is why we recommend that you disable them. In this article, we will start by explaining what WordPress pingbacks and trackbacks are and address their pros and cons. Then, we’ll show you how you can disable both on your website.

Let’s take a look!

Table of Contents displays
Introduction to WordPress trackbacks and pingbacks.
The first thing we need to do is to clearly define the terms “pingback” and “trackback.” Although they are similar in many ways, the two are still distinct techniques.

What are WordPress trackbacks?
A trackback is a notification that WordPress sends to an external site when you link to it in your content. Let’s say you just published a new blog post about tips for buying a laptop, which includes a link to another website that contains some great tips for your readers.

In this scenario, you might send a trackback “ping” to that site to get the owner’s attention. That person might then choose to approve the trackback. This would show an excerpt of your post and a link to your site in their comments section.

What are WordPress pingbacks?
Pingbacks in WordPress have a very similar purpose, but they work slightly differently. In fact, they were actually created to be a better version of trackbacks in order to solve some of the problems with the technique (which we will see in a moment).

The key thing to understand is that while trackbacks are sent manually, pingbacks are automatic. To illustrate this, we will go back to our previous example. Suppose you set up pingbacks on your blog and just posted that article on laptop buying tips (linking to the same external website as before).

In this case, a pingback would immediately be sent to the site you linked to, provided that pingbacks are also enabled. That site would then automatically check to see that the pingback came from your post (and was not a type of spam), before displaying it as a simple link in the comments section. In most cases, pingbacks will not include an excerpt from the post in question, although this depends on the theme a website uses.

As you may have guessed, trackbacks and pingbacks work very similarly. The most important differences are ‘under the hood’: the communication technologies used are different. However, it is not necessary to understand all the technical details to get an idea of the pros and cons of using these techniques.

Pros and cons of using WordPress trackbacks and pingbacks on your site
To understand why we recommend that you disable pingbacks and trackbacks, let’s address their pros and cons.

Pros
It is easy to see why so many people have used both pingbacks and trackbacks in the past. Potential benefits of these technologies include:

  • Increasing backlinks to your site, driving traffic to you and improving search engine optimization (SEO) .
  • Building links to related sites and encouraging them to share your content by showing your willingness to promote theirs.
  • Offer more value to your readers by introducing them to other content they may find useful .

Against
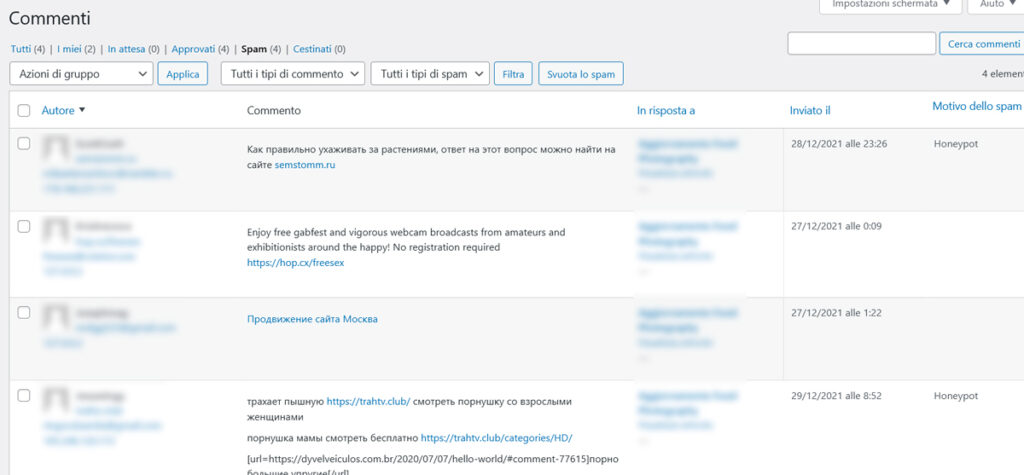
The biggest problem with trackbacks is that they were soon used to send huge amounts of spam. Since trackbacks can be manually sent to any site, spammers use them to post their links on as much content as possible.

Keeping these spam trackbacks away from your site requires checking them manually since there is no other way to verify that they are not fake. Of course, the time spent moderating these trackbacks could be better used for other activities. It also makes them much less valuable than they could be in a theoretical sense.

As mentioned earlier, pingbacks were designed primarily to solve this spam problem. That is why they work automatically and require verification before they can be posted. Also, they will not even be posted unless both blogs have pingbacks enabled.

However, pingbacks soon fell victim to the same downsides as trackbacks. Many spammers were able to easily overcome the protections put in place. This resulted in false and malicious pingbacks. Again, this means that sites with this feature enabled generally have to spend a lot of time moderating the resulting comments .

In addition, you can end up with something called “auto-ping.” If you link to another post or page on your site, the pingback feature will send a notification (as if you were linking to an external source). This is not very useful and can quickly become a nuisance, although you can eliminate this problem with a free plugin like No Self Pings.

Most sites should disable WordPress pingbacks and trackbacks (here’s how)
There has been much controversy over the years about whether the use of pingbacks and trackbacks have several disadvantages. Nowadays, however, it is widely recommended to avoid both techniques .

After all, the use of WordPress pingbacks and trackbacks tends to generate spam and wasted time. While they may provide some benefits, there are better ways to drive traffic to your site .

Moreover, very few people actually use these technologies legitimately. This means that, more than in the past, you are likely to receive many more fake pingbacks and trackbacks than legitimate ones.

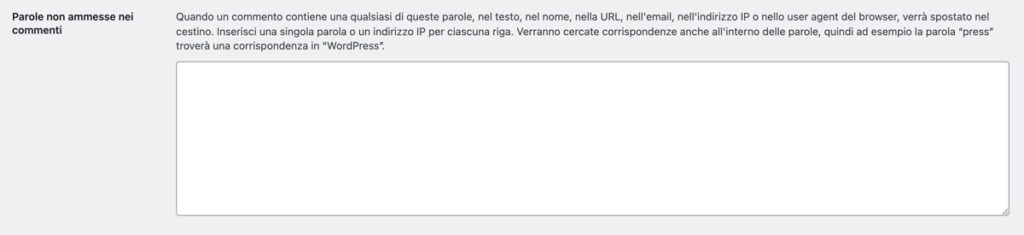
Fortunately, disabling both on your site is a simple procedure. In the WordPress dashboard, you can go to Settings > Discussion :

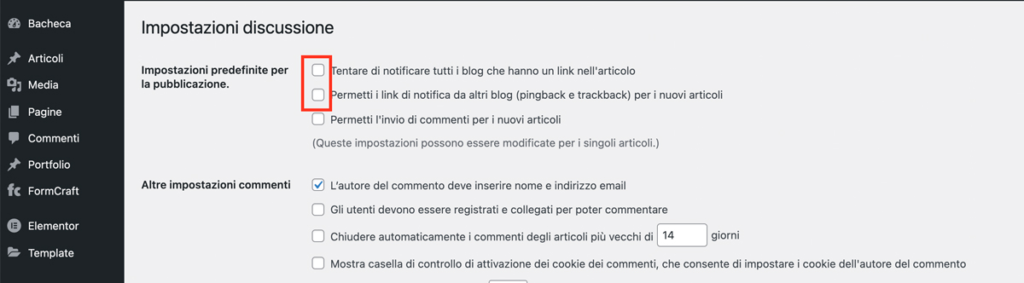
Here, we recommend that you uncheck the first two options:

  • Attempt to notify all blogs that have a link in the article
  • Allow notification links from other blogs (pingback and trackback) for new articles

This will prevent your site from creating and receiving pingbacks and trackbacks. As a result, it should be easier to keep track of the comments section . In addition, you will free up time that can be devoted to more effective strategies.

Block pingbacks and trackbacks!
Pingbacks and trackbacks have advantages in theory, but there are many reasons why they are rarely used nowadays. Ultimately, the downsides of both outweigh the potential for a slight increase in traffic and visibility.

Keeping WordPress pingbacks and trackbacks active on your site is likely to cause spam from people who just want to get a link of any kind posted to your content. The good news is that you can quickly disable both options in the WordPress settings screen .

6 ways to block comment spam on your WordPress site

Comment spam is a fact of life on the Internet. If you enable comments on your website, you will have to deal with spammers. To prevent your site from making a bad impression, you will have to find a way to stop comment spam.

Although you may not be able to eliminate spam completely, you can do a lot to decrease it. For WordPress users, there are simple changes you can make to block or hide these comments before your visitors see them. You can even use an effective anti-spam plugin to strengthen your defenses.

In this post we’ll talk a little bit about what comment spam is and why it happens. Then we’ll show you six simple ways to stop comment spam on your WordPress site.

Let’s take a look!

What comment spam is (and why it’s a problem)

Spam comments are often easily recognized by their generic content.

If you allow comments on your site, you are bound to receive comment spam. As your site becomes more popular, spam is likely to become an even bigger problem. There are many types of comment spam these days, but most of it is automated, posted by spam bots that use short, generic posts as cover to include links.

Whatever form it takes, comment spam is a real problem because:

  • When comment sections are full of spam posts, it is harder for legitimate visitors to have conversations.
  • Leaving spam comments on your content makes your site look unprofessional.
  • Many of these comments include malicious links designed to induce visitors to provide personal information.

Clearly, it is critical to do everything you can to prevent comment spam from appearing on your WordPress site. Fortunately, this is not difficult to do once you know the right techniques.

How to stop comment spam on your WordPress website (6 simple solutions)
The following six solutions are all smart ways to stop comment spam on your website. You can try all of these methods or choose the ones most relevant to your needs.

  1. Reduce the number of links allowed per post
    As mentioned earlier, most comment spam is designed to add links in the comments section and get people to click on them. Therefore, one way to combat spam is to allow fewer links in comments. Legitimate visitors will also be prevented from posting many links, but slowing down spammers may be worth this potential inconvenience.

From the WordPress dashboard, you can go to Settings → Discussion to make this change. Look for the Comment Moderation section :

Here you can decide how many links will be allowed in a comment before it is marked for moderation. You can also reduce the number to zero if you want to request moderation for any comment with links.

  1. Create a list of blacklisted words.
    Many spam comments contain recognizable keywords. This makes it easier to detect them and prevent them from being displayed on your website. You can simply create a “blacklist” of words and your site will mark any comment that contains one.

To do this, go back to Settings → Discussion in the WordPress dashboard and find the section Words Not Allowed in Comments :

Here you can enter your list of words. When a comment is posted that contains one of these words, it will be sent directly to the trash. Of course, it is important to choose the words on your blacklist carefully so that you do not delete legitimate comments. For suggestions, you can check the recommended comment blacklist for WordPress on GitHub.

  1. Limit commenting privileges to registered users
    The goal of most spammers is to post on as many pages and sites as possible. This means that if you can make it harder for them to add their comments to your site, they may simply move on to the next goal.

You can achieve this by limiting commenting privileges only to users who have registered on your site . This puts an additional barrier between spammers and the comments section. As a side benefit, it encourages visitors to register for an account or subscription.

This option is also available in the Settings → Discussion section in WordPress. You will find it in More comment settings :

Just check the box labeled Users must be registered and logged in to comment and save changes.

  1. Set up a comment moderation system
    Simply put, comment moderation is when you require that some or all comments be approved by someone before they can be posted on your site. If you have time and resources to spare, this can be a smart strategy.

In WordPress, you can enable a comment moderation system very easily. Simply go back to Settings → Discussion and check the section Before a comment appears :

By selecting The comment must be approved manually , all comments left on your site will be kept as Pending until they are reviewed. You can then review them all and decide whether to let them pass or delete them. You can find more tips on setting up a comment moderation system on the WordPress site.

  1. Use an anti-spam plugin
    Finally, it would be remiss not to mention anti-spam plugins. These tools can be an effective way to stop comment spam and can take care of separating positive from negative comments.

Many WordPress installations come bundled with Akismet, and for good reason:

This anti-spam plugin connects to a constantly updated database, so it is very useful in recognizing which comments create problems and filtering them out. It also allows you to see which comments have been flagged.

Akismet is a great option for most users, but there are also other excellent alternatives. ,Antispam Bee, For example, is a well-reviewed plugin that has several customizable settings and features.

Whichever plugin you choose , you will take an important step in stopping comment spam on your website.

  1. Switch to a new commenting system (such as Disqus).
    This method doesn’t work for all sites, but with some third-party comment systems, such as Disqus, they can help you eliminate most of the spam for you. Another solution is to use Facebook comments on your site.

Conclusion
Spam comments can quickly ruin your site, making it look unprofessional and driving away real visitors. Cleaning up all that spam after the fact is challenging. That means you should consider spending some time up front to develop a robust anti-spam strategy.

To stop comment spam on your WordPress site, you can:

1.Reduce the number of links allowed per post
2.Create a list of words on the “blacklist’
3.Set up a comment moderation system
4.Restrict commenting privileges to registered users
5.Use an anti-spam plugin, such as Akismet .
6.Switch to a third-party comment plugin.

7 best video hosting platforms

Videos on social media get more engagement than any other medium, and the same goes for your website. If you’re not leveraging video to increase clicks and sales, you’re missing out on a big piece of the market.

But before you add videos to your website, you’ll want to take steps to keep your site’s performance at peak levels. The best way to do this is with a video hosting platform.

Let’s look at seven of the best video hosting solutions for your website.

Table of Contents view
What is a video hosting platform?
Video hosting is a solution for storing your videos on a third-party server instead of hosting them yourself on your web server. Video hosting platforms are the services that allow you to upload videos and share them, either for free or by paid subscription.

Some video hosting sites host only live or prerecorded content, while others offer a combination of both. In short, a video hosting platform serves as a vehicle for effortlessly delivering video to the public.

Why use a video hosting platform?
The simple answer is that videos are by far the largest file type on a traditional website, and size is the main enemy when it comes to uploading to a website.

When someone visits your site, their browser loads all the resources on the page: text, photos, videos, and other content. The average web page with text and video is only a few megabytes; one minute of HD video is almost 90 MB in size. The more data to be transferred, the longer it takes to load the page. And since slow websites lose conversions, it is in your best interest to increase speed.

How? With a video hosting site. These platforms allow you to embed a link to a video hosted on their server rather than trying to manage a large video file on your own server.

In addition, video hosting platforms can save you money. Because web hosting usually limits daily or monthly bandwidth (especially on limited budget plans), hosting heavy video is not the best use of your resources. By using a video hostig platform, you won’t have to upgrade to a plan with higher bandwidth.

The 7 best video hosting platforms
Although all video hosting platforms are designed to make it easy to add video content to your website, they are not all the same. There are countless options available on the Internet, some of which you may have already heard of.

To help you narrow down your search for the best video platform, we will discuss our seven favorites (in no particular order).

  1. YouTube

When it comes to free video hosting, few platforms have as much staying power and name recognition as YouTube . This recognition is one of the main reasons to use YouTube as a video hosting platform: it has been a familiar and reliable service since 2005.

Pros
Some of the other advantages of YouTube are:

  • Unlimited storage space : allows you to upload 12-hour videos and 128 GB files
  • Integrated audience : YouTube is not only a hosting where you can host your videos, it is also a social media platform. With over 2 billion monthly users, you can reach new customers organically without them visiting your website. And if you want your videos to be exclusively on your site, you can make the content unlisted or private.
  • Take advantage of Google Analytics : because Google owns YouTube, you can analyze how much traffic your site gets based on how many users have clicked on your YouTube video links.

Cons
Since YouTube is a free service, you will have to endure some downsides, including:

  • Embedding limitations : there are only a few ways to display YouTube videos on your website and all of them are watermarked, which is not ideal for businesses.
  • Unwanted competition : ads from your competitors may appear on your videos, and the “Recommended Videos” list that appears at the end can distract customers from your content.

Overall, YouTube may not be the most professional option for businesses, but it is a fantastic platform for uploading videos for free.

Costs
Hosting videos on YouTube is 100% free, with no hidden costs.

  1. Vimeo

Vimeo is another free hosting option with a smaller audience. The platform is more geared toward professional videography than everyday content. That said, you can upload any video you wish to embed on your site.

Pros
Here are some reasons to try Vimeo:

  • Elegant video embedding : The service allows you to customize the look of your embedded videos. Change the appearance of the player, choose what happens when a video ends, and show multiple videos at once.
  • Ads – Unlike YouTube, there are no ads before, during or after the video.
  • HD Video : Your viewers can enjoy uninterrupted HD videos with quality up to 1080p.

Cons
Disadvantages of Vimeo include:

  • Free account limits : the free option is powerful, but you can only upload 500 MB of video per week and 5 GB in total.
  • Niche content : The platform seems to focus on streaming short films and music videos, so the best videos may not reach a wide audience.
  • Little traffic – If your goal as a content creator is to generate traffic to your site, don’t expect much traffic from Vimeo. Although Vimeo has 100 million subscribers, it unfortunately pales in comparison to the number of YouTube subscribers. Another factor against Vimeo is Google: this is unconfirmed but some content creators suspect that Google prefers displaying YouTube videos in search results.

All in all, Vimeo will satisfy most companies, but prolific posters will have to pay for an upgrade.

Costs
In addition to the free Vimeo Basic option, Vimeo offers five plans with increasing benefits:

  • Plus ($7/month)
  • Pro ($20/month)
  • Premium ($75/month)
  • Enterprise (customized pricing for large-scale operations)
  1. Facebook
    Although Facebook has become famous as a social media platform, it can also function as a video hosting solution. Uploading videos to Facebook and linking them to your website requires no special experience.

Pros
Facebook is a useful video hosting platform because of:

  • Social media integration : the ability to share videos easily with your Facebook followers is the best part of using the platform for video hosting.
  • Unlimited hosting space : you will never run out of storage space!

Cons
The following areas could be improved:

  • Below average video quality : the resolution is generally limited to 1080p or lower.
  • Advertisements : your customers might see ads on your videos, even when they are on your website.

Facebook wins for familiarity and ease of use, but it is not the most professional option.

Costs
To use Facebook to upload videos, all you need is a free account.

  1. Dailymotion

Like Vimeo and YouTube, Dailymotion is a social video platform that also serves as a hosting solution. You can upload videos on the platform and embed them on your website reaching Dailymotion viewers organically.

Pro
If you’ve never heard of Dailymotion, here’s what you’re missing:

  • No storage limit : the total video storage limit is infinite (although you can only upload two hours of video per day).
  • Easy registration : start uploading content in minutes, with Facebook and Google social login options.

Cons
The platform is behind in some areas, such as:

  • Ads : ads will play before, during and after videos, even if embedded on your site.
  • Upload limitations : videos cannot be longer than an hour and the maximum file size is 2 GB.

Dailymotion is an excellent free option, but don’t expect the YouTube-level amount of organic coverage.

Costs
There are no costs: Dailymotion is a free service.

  1. Brightcove

Brightcove is a video platform that combines hosting with innovative marketing tools. Video hosting is just the beginning; the service is about creative delivery and integration with other platforms. When you use Brightcove, you will join companies like Wendy’s and Hugo Boss.

Pro
Not surprisingly, world-renowned organizations use the platform, with benefits such as:

  • Detailed analytics : Brightcove’s detailed video information is best-in-class, with comprehensive data on users, devices, viewing time, and more.
  • No limits : you can upload files of any size and quality. Storage is dictated by your plan.

Cons
This premium video hosting site has one major drawback.

  • High startup fees : the cheapest option is $199 per month, with higher tiers available.

Brightcove is probably the best video hosting platform on the market, if you can afford it. Small businesses should evaluate something else.

Costs
Brightcove’s pricing is customizable but not stated. The only way to receive a quote is through a contact form.

  1. Hippo Video

With Hippo Video you can manage videos for sales, customer service, and marketing purposes. Choose one or all three, then start sharing videos with the world.

How do permalinks affect SEO?

The permalink structure you choose can affect the search engine optimization (SEO) of your website . WordPress allows you to select from multiple URL formats, but not all of them are SEO friendly or easy to use. Therefore, understanding how permalinks work in WordPress and their impact on SEO is essential. That’s why we’ll introduce you to permalinks and the options WordPress offers, then explain how permalinks and SEO go hand in hand.

Table of contents view
What is a permalink?
A permalink is a URL. When we talk about permalinks in WordPress , we are referring to the URL structure you use on your website. By default, new WordPress sites use a link format similar to the following for pages and posts :

tuositoweb.co.uk/?p=123

This is the structure of the “simple” permalink. The number at the end of the URL corresponds to a specific post or page ID , but until you click on that link, you can’t know where it leads.

In addition to that basic structure, WordPress offers many other options for permalinks, especially if you are using WooCommerce .

WordPress allows you to change your site’s permalink structure at any time. However, we usually recommend that you choose a URL format as early as possible in the life of your site and always stick to that. Changing permalinks becomes more messy as your website grows and develops a large library of content. Such growth means updating dozens or hundreds of URLs and having to wait for search engines to do the same. Also, when URLs change, you can lose important backlinks to your site , but links to them do not.

As a general rule, the best options for permalink structures are the name of the post or a custom layout that adds the category to the URL so that it looks like this:

tuositoweb.co.uk/category/post-name

In the following sections, we will discuss why these are your two best options. For now, let’s talk about the connection between URL structure and SEO.

How do permalinks affect SEO?
There is a clear correlation between permalinks and SEO. Google considers your URLs as ranking factors . In short, the search engine uses permalinks to get information about your content and position it accordingly in its search engine results pages (SERPs).

URLs should provide some information about a page’s content something you cannot get with a link similar to tuositoweb.co.uk/?p=123.

If your permalinks are not related to your content, Google may not rank them high in relevant search results. In addition, you may turn away potential readers: if they see confusing links, users are less likely to click on them and read your articles.

.

How to set up your Permalinks for SEO in WordPress.
Permalinks are fully customizable, and WordPress also offers a number of variables so you can set them up however you like. We will now explore some of the different options for your posts and pages.

Setting the Slug URL in a post or page
WordPress automatically generates a URL for every page and post you publish. However, you can control the last part of the link, called the “slug” .

In the following URL, the slug is post-name :

tuositoweb.co.uk/post-name

When using the WordPress editor, you can update the slug of a page by opening the post settings in the Block Editor. The tab with the Post settings has a section called Permalink. Inside you will find a URL slug field . It contains the slug that WordPress generates from the title of the post or page.

When you set a title for a post or page, WordPress uses it to generate a slug. It includes each word in the title, separated by hyphens.

For short titles, you could leave the slug as is. TAny way, we generally recommend cutting off part of it to make the URL more concise.

Decide how many words the URL Slug should include.
URL slugs should be relatively short and direct. In most cases, 2-6 words in length gives you enough room to include the main keyword of the article and reduce unnecessary parts of the title .

Take the title of this post, for example, which is “How do permalinks affect SEO?” Instead of keeping the entire title as the slug of the post, we have reduced it to: /permalink-seo

These two words are enough to let you know what you will read if you see the URL in SERPs. The link also provides information to Google about the topic of the post. Ideally, you will also include the keywords you wish to target in the URL slug. If this post was specifically about keywords in permalinks (as in the next section being the entire post), we might choose /permalinks-keywords-seo to better fit what Google and users would expect.

Using keywords in permalinks
If you are targeting a specific keyword (or several) in your content, it should be part of the slug. Ideally, you will include the main keyword in both the title and the slug (and the meta description!). This way, everything will look natural once users read the title of the post.

Since you have to keep slugs relatively short, it may be difficult to include multiple keywords in less than five words. In most cases, you should focus on the main key phrase. This way, your slug will be concise and you will avoid keyword stuffing in your URLs.

Adding categories and tags in permalinks for SEO
Many WordPress websites add categories and/or tags to their permalink structures. Putting the category in front of the slug of a blog post is like this example:

tuositoweb.co.uk/category/slug

Adding categories and tags to your slugs might be a good idea if you run a website with a lot of content and multiple categories. This way, you can avoid confusion among similar URLs. However, this approach generally works well only if you have short category names.

However, URLs can get out of hand quickly when you add multiple categories to a blog post or use tags with numerous words. Both users and search engines prefer short URLs that are more relevant and easy to understand.

If you decide to add categories to WordPress permalinks, be sure to assign one category per page or blog post. This way, you can keep URLs short. Also, don’t be afraid to update category names if your current taxonomy uses multiple words.

Conclusion
When browsing a website, it can be easy to not pay attention to the URLs of the pages you are visiting. However, these links play a significant role in SEO. Search engines prefer short URLs. In addition, using permalink structures with descriptive slugs can improve your site’s ranking.

We recommend keeping URL slugs between two and five words for the best possible results. You can also benefit from including keywords. In most cases, the main keyword for each page or post will be an excellent slug URL. In addition, WordPress makes it easy to update your website’s permalink structure.

What is lossless compression and when to use it

The use of images, videos and other files can improve the quality of your blog posts and the appearance of your WordPress website. However, including too many “heavy” elements may slow down your site and affect its overall performance . Fortunately, lossless (lossy) compression can reduce file size without compromising file quality.

In this guide, we will look at lossless compression and when you should use it. Then we will see how to apply this compression method to your images and files.

Let’s get started!

Table of Contents view
What is lossless compression?
Lossless compression can reduce file size by removing and isolating redundant data . This method can reduce files without affecting their overall quality. It is also completely reversible.

Lossless data compression uses an algorithm that looks for repetitions of words, patterns, and other unnecessary data. It then replaces this information with numbers and stores the original data in a separate index file.

It also removes metadata from your images. Therefore, this compression method creates leaner files without removing additional information.

Lossless compression is best suited for photos with transparent backgrounds and images with lots of text. These are the most common lossless file formats:

  • Portable Network Graphics (PNG)
  • Graphics Interchange Format (GIF)
  • Compressed Files (ZIP)
  • Unprocessed images (RAW)
  • Bitmap image files (BMP)

In addition, lossless compression is increasingly being used for audio files. Streaming giants Spotify, Apple Music and TIDAL use this method to speed up the loading of content without reducing the quality of the music.

Why should you use lossless compression?
As mentioned earlier, lossless compression uses an algorithm to compress image formats and other file types. These are some of the most common algorithms used:

  • Huffman encoding : this algorithm assigns different values to characters and their frequencies.
  • Arithmetic encoding : encodes the entire file as a series of characters with symbols assigned to them.
  • Run-length encoding : looks for repetitions of characters in the code, then encodes them into smaller bytes.

These compression methods reduce files without damaging their quality. You can also restore files to their original size because of their indexed data. Therefore, lossless contrasts with lossy compression , which causes irreversible changes to images and other media files.

Image compression is essential to improve the performance of your site. For starters, leaner images improve page load times. This is one of Google’s key ranking factors in determining where to place your content in search engine results pages (SERPs).

Google uses a set of metrics called Core web Vitals . The following two metrics are relevant to the images on your website:

  • First Contentful Paint (FCP). FCP measures how long it takes to display the first element on your page. This could be a text or image element. If your site must load an image or other media file first, using lossless compression will speed up the loading time for your users.
  • Largest Contentful Paint (LCP). Measure how long it takes to display the ‘largest element on your page. This will probably be one of your images. Therefore, if your picture has a smaller file size, your LCP score will be better.

Smaller images are not only important for SEO. They are also essential for user experience (UX). If your pages load slowly, readers may get frustrated and move away from your website.

Finally, lossless compression maintains image quality. Therefore, its use will not make graphics grainy or blurry on your website. As such, this compression method can help your site look professional to your readers.

2 Ways to apply lossless compression to your images
You can use a few different methods to apply lossless compression to your images. Some of these strategies occur within the WordPress dashboard, while others rely on external software. Let’s take a look at two different compression options!

  1. Use an image compression plugin.
    Some WordPress image optimization plugins can compress your images using the lossless method. Using a plugin is a quick and easy option because the tool can apply compression to the entire website. Therefore, you will not need to manually edit each image, which can be time-consuming.

We recommend using the Imagify plugin to compress your images. It has multiple levels of compression built in and works for a wide range of image types:

After installing, activating the plugin and requesting an API key via email, go to Settings > Imagify in the WordPress dashboard. You will then see three different levels of optimization at the top of the page:

We recommend that you select NORMAL from the different options. This setting will apply lossless compression to your images. You can also perform this compression automatically by enabling the automatic image optimization configuration on upload .

  1. Use image editing software
    Image editing applications, such as Adobe Photoshop and GIMP , often allow you to choose a compression method for your images. The exact options and process vary depending on the software you choose.

For example, if you have GIMP, you can use lossless compression relatively easily. First, open your photo with the image editing software. Then, go to File> Export As.

Then, open the drop-down menu under Select file type (by extension) and scroll down to select the ‘PNG image :

Click Export and you will see a popup window where you can choose the level of lossless compression from 0 to 9:

Finally, click Export to compress and save the image as a PNG. The file should now be smaller without compromising the quality of the photo.

Advantages of lossless compression
The main advantage of lossless compression is that it does not reduce the quality of the image. Therefore, it may be ideal for websites and tasks that rely on images.

For example, if you run a high-end e-commerce shop , you will probably want to display your products. Using the highest quality images can show minute details and inspire users to make purchases.

Similarly, a professional photography portfolio can also benefit from this method of compression. You can showcase your skills and possibly attract new clients and sales while maintaining high-quality photos.

In addition, lossless compression is reversible. All removed metadata is saved in separate files. Therefore, you can restore your images if you are not satisfied with the results of compression.

Finally, this compression method applies to multiple file types. If your Web site uses different elements such as GIFs, audio files, and PNG images, you will be able to compress them all to reduce your site’s loading time.

Disadvantages of lossless compression
Unfortunately, lossless compression does not offer as many performance advantages as lossy (lossy) compression . Since this method does not delete any data, the resulting images may still have significant file sizes. Therefore, you might consider using additional optimization techniques to speed up your website.

For example, we recommend enabling GZIP compression on your WordPress site. GZIP provides your general data files as small as possible to visitors, helping their browsers load your website faster. Fortunately, this type of compression is also easy to configure with a plugin such as WP-Optimize :

In addition, you might consider using a content delivery network (CDN) . A CDN uses a number of servers around the world to deliver content to users from the nearest locations. As such, this network can improve your web performance for visitors from around the world.

Conclusion
Image compression can reduce file sizes and improve loading times. As such, compression can improve the user experience of your site and increase search engine optimization (SEO).

As discussed in this article, lossless compression reduces image files without reducing their quality. This method removes metadata and repetitive information and saves it in a separate file. Therefore, you can speed up your website while maintaining bright and exciting graphics to attract your readers.

Largest Contentful Paint (LCP): 5 ways to improve it in WordPress

The overall performance of your site can significantly affect your search engine rankings. Google uses several metrics to measure the quality of your site, including the Largest Contentful Paint (LCP). Therefore, improving your LCP score can help your website perform better and rank higher in SERPs.

Fortunately, you don’t need a lot of technical skills to get started. By identifying the heaviest element on your page, you can take the necessary steps to optimize your content and speed up your site.

In this post, we will look at how to measure LCP. We will then share five strategies that can help you improve the Largest Contentful Paint score in WordPress.

Let’s get started!

Table of Contents hide
How to measure Largest Contentful Paint
Five ways to improve the largest contentful paint in WordPress.

  1. Optimize your images
  2. Eliminate resources that block rendering
  3. Use a content delivery network (CDN)
  4. Remove unused plugins
  5. Reduce the response time of your server
    Improve your LCP in WordPress today
    How to measure the largest contentful paint
    In 2020 Google introduced the Core web Vitals project . The popular search engine uses this set of metrics to measure the performance and quality of your site.

One of these metrics is called Largest Contentful Paint and measures the time it takes for a page to fully load the largest element on the screen. In most cases, this content is a prominent visual element such as a slider or hero.

You can measure your LCP score using Google’s PageSpeed Insights . This tool collects dreal performance data from different users and provides a breakdown of each score:

In addition to giving you the times, it will also identify the actual element on your site that Google uses to determine the largest content in the Diagnostics section further down the page

Most other speed testing tools can now also test the largest contentful paint, and this can give you a little more flexibility for testing from different locations, devices and connection speeds.

According to Google, a good LCP score should be 2.5 seconds or less. If the largest element of your pages takes longer to load, it can cause a poor user experience (UX) . This can, in turn, lead to a higher bounce rate. Therefore, it is essential to optimize your site to achieve a better LCP score.

Five ways to improve the largest contentful paint in WordPress
As we have seen, your LCP score plays a key role in the overall performance of your site. With that in mind, let’s take a look at five effective ways to improve this score and speed up the loading of your website!

1.Optimize your images
2.Eliminate resources that block rendering
3.Use a content delivery network (CDN)
4.Remove unused plugins
5.Reduce your server’s response time

  1. Optimize your images.
    As mentioned earlier, LCP measures the time it takes for a website to render the largest element on the page. Media files such as images and videos tend to be the heaviest files.

To solve this problem, it is essential to optimize your images . In fact, this method is recommended in your PageSpeed Insights report

To resize your images and optimize them with tactics such as compression and webP format , you can use an image optimization tool such as Optimole :

This plugin optimizes your WordPress images in real time and makes sure each graphic element is resized correctly for different devices. It also compresses your photos without compromising their quality.

In addition, Optimole will serve your images through a content delivery network (CDN). This way, when someone visits your website, the optimized graphics will be loaded from the nearest network location instead of from your WordPress site’s server, reducing download speed.

By resizing and compressing your images, you can greatly increase the speed of your site. Smaller files will load faster, which, in turn, will improve your LCP score.

  1. Eliminate resources that block rendering
    Resources that block rendering are HTML, CSS, and JavaScript files that force browsers to delay rendering content on your site. Therefore, these elements increase page load times, which results in a poor LCP score.

You can solve this loading problem by removing the elements that block rendering or by forcing their execution after everything else has loaded. Fortunately, this process is simpler than it sounds.

In fact, you can use a plugin such as WP Rocket , which will do all the work for you:

This tool will automatically remove all CSS and JavaScript that blocks the display on your website. As such, the plugin will help minimize any lag in content rendering, resulting in faster loading times for users of your site.

If you are using WP Rocket, the most useful settings to enable are in the File Optimization tab .

Under CSS Files , enable the following:

  • Optimize CSS Publishing > Remove Unused CSS.
    Under JavaScript Files , enable the following:
  • Load deferred JS
    Delay the execution of JavaScript
  1. Use a content delivery network (CDN).
    Another effective way to improve the Largest Contentful Paint score in WordPress is to use a content delivery network (CDN), a network of servers distributed in different locations.

When you use a CDN, your visitors will be provided with cached copies of your content from the server geographically closest to them. In this way, your site will load faster for your users.

In addition, a CDN minimizes the load on your hosting server further increasing the speed of your site.

If you are using Optimole, you are already benefiting from a CDN to upload your images. But you may also want to use a CDN for your other static files and to further improve your Largest Contentful Paint score.

If you want to set up a hassle-free CDN, you can take a look at RocketCDN. It is directly integrated into WP Rocket:

This tool automatically applies optimal configuration settings to improve the performance of your site. The CDN is powered by StackPath , which has over 45 edge locations around the world.

A CDN can be a good investment if your site targets an international audience. It makes sure that your content loads quickly for all users, regardless of their location. This configuration can significantly improve your LCP score.

  1. Remove unused plugins.
    Your LCP score can also be affected by the plugins you use on your WordPress site. Heavy software can slow down your site, especially if these tools use a lot of CSS or JavaScript.

PageSpeed Insights recommends removing all plugins that add volume to your pages:

More specifically, you will need to eliminate all tools that load unused CSS and JavaScript. Having many unused scripts on your site adds unnecessary data transfer. Thus, these processes slow down content rendering.

The PageSpeed Insight report provides you with the URLs of problematic scripts to help you identify those heavy plugins. However, if you have a large number of tools on your site, removing them can still take a long time.

Therefore, you might start by removing any unused or unnecessary plugins from your site. You can then try to find lighter alternatives.

  1. Reduce your server’s response time.
    Server response time, also known as time to first byte (TTFB), is the time it takes for a user’s browser to receive the first byte of content from your page. Slow server response times will result in delays in page loading, which will affect your LCP score.

As noted in PageSpeed Insights, plugins, themes, and hosting service can affect server response times:

If you have removed unused plugins and scripts from your site and are still getting a poor LCP score, the problem may be your server. Therefore, it may be time to upgrade to a better hosting plan.

Shared hosting is often the best solution for new websites because it is affordable. However, with this package, you share a server with many other website owners. Therefore, if the server receives a large number of requests at once, it can slow down response times.

As your site grows and you begin to receive more traffic, it is worth considering upgrading to a more advanced plan. We recommend opting for managed WordPress hosting . With this solution, your web host will handle all the optimization tasks necessary to keep your website running smoothly.

You might also consider a virtual private server (VPS) or dedicated hosting . Although these services can be a bit expensive, you will get more server resources. In addition, the provider will configure the server according to your specific needs and requirements. Therefore, it will be better equipped to handle large amounts of traffic and efficiently deliver your content.

Enhance your LCP in WordPress today
The user experience (UX) and loading time of your site can affect your visibility in search results. Therefore, it is critical to improve the overall performance of your site, including your LCP score.

In this post, we reviewed five effective ways to improve the largest contentful paint score in WordPress:

1.Optimize your images, using a compression tool.
2.Eliminate resources that block rendering with a plugin
3.Use a content delivery network (CDN)
4.Remove unused plugins from your site.
5.Reduce your server’s response time by upgrading to a more powerful hosting plan.

6 best practices for optimizing image SEO in WordPress

You may already know how search engine optimization (SEO) works and why it is important. However, it is not enough to use keywords in your posts and write catchy meta descriptions . For optimal website performance, you will also need to work on image SEO. In this post, we will take a closer look at SEO for images and how it can improve your WordPress site. Then, we will share some practical tips for optimizing your images.

Let’s get started.

Table of contents view
What is SEO for images?
Images make your site visually more attractive and at the same time break down your content into more assimilable sections. However, photos also contribute to the overall performance of your website.

Whether you are setting up your first WordPress site or conducting an SEO audit , it is critical to spend some time optimizing your images. This process may involve writing alternative text , compressing images or ‘using relevant keywords in file names.

When done well, image SEO can make your content easier for search engine crawlers to understand and can, in turn, increase your ranking in search engine results pages (SERPs). Optimization can also help your photos appear among the top image search results.

Finally, SEO for images can also help you improve the performance and ‘user experience (UX) of your site . For example, compressing your photos and using the correct size can speed up the loading of your website. Since page speed is a ranking factor for Google, this process can further increase your visibility in SERPs.

How does SEO for images improve your site?
As we mentioned, SEO for images can be beneficial to your website. Let’s take a closer look at its impact on your site’s performance. In 2020 Google launched the Core Web Vitals project , a set of metrics that measure website performance and quality. You can test your website with a tool like PageSpeed Insights .

As you can see, images can (and will) affect your site’s score. Your LargestContentful Paint (LCP) score indicates how long it takes your website to load its largest element. In many cases, that element will be a photo.

In addition, PageSpeed Insights can give you some tips for image optimization:

Large image files can slow down your site, which may drive visitors away. Slow loading times can also hurt SEO. Google views loading speed as an indicator of quality. It wants users to be able to find the information they are looking for quickly.

For this reason, image optimization can speed up page loading. This increased speed can lead to better UX, improving your visibility in search engines and impressing your website readers.

SEO for images can also make your website more accessible . This is especially true if you use alternative text to describe your photos. This feature allows users with visual impairments to better understand your images. We’ll take a closer look at alternative text (and other best practices for image SEO) in the next section.

6 best practices for optimizing image SEO
Now that you know a little more about how SEO for images works, it’s time to look at some best practices for boosting your site’s performance. If you follow these six tips for optimizing your images, your site will definitely improve.

  1. Assign descriptive file names to images.
    As mentioned earlier, image SEO allows search engines to understand your images. You can make this process even easier by assigning descriptive file names to your photos.

By default, any photo taken with your camera and transferred to your computer will have a file name similar to this: DSC1234.jpg . This title does not provide any information about the content of your image.

Therefore, before uploading your images to WordPress, you should definitely give them SEO-friendly names. We recommend that you avoid generic file names (e.g., “restaurant.jpg”) and try to be more specific (e.g., “first-dish-at-restaurant.jpg”). This will allow Google and other search engines to index them more easily and display the images in more specific searches.

  1. Compress and resize your images.
    If you have a site with a lot of media, you may want to optimize your images. Large files will put a strain on your server, take up a lot of space in your site’s memory, and load much more slowly than smaller ones.

For this reason, we recommend that you compress your images before uploading them to your WordPress site. You can do this by using your favorite photo editor or an online tool such as TinyPNG :

Alternatively, you can install an image compression plugin such as Imagify . This tool will automatically compress any image you upload to your site.

Optimization tools reduce the file size of your images, making your site lighter. There are two main types of compression:

  • Lossy compression : helps you remove large amounts of data from your image files, but can affect the quality of your photos.
  • Lossless compression : reduces image files without affecting their quality.

In addition to compressing your photos, you will also need to use the correct image size on your pages. By default, WordPress generates different image sizes for each photo you upload, including thumbnail, medium, and large.

It makes sense to use the thumbnail version for images in your blog feeds. Similarly, you will need to resize your images when designing web pages or using them in blog posts. Using images larger than necessary will only add an unnecessary burden to your pages.

Also, we recommend that you use the right format for the images on your site, as you may need a small JPG instead of a transparent PNG or animated GIF . You should also try to provide WebP images whenever possible.

  1. Use images in the right context
    To help Google better understand your images, you need to be sure to use them in relevant places in the post. This process involves placing your pictures near contextual content.

For example, imagine you are writing a blog post about the best attractions in Rome In that case, you should place photos of the places or landmarks you mention in relevant sections. As we have done in this article, you can use text to introduce the image you are about to show. However, using these same images of Rome in a blog post about French cuisine that makes no mention of §Italy has the potential to make Google think your content is unreliable .

In addition, you can write captions to make your photos more contextual:

Captions help readers understand what an image represents or where it was taken. This feature can further improve the UX of your site. Alternative text is also an important player in contextualizing your images.

  1. Add alternative text or alt text
    Alt text is perhaps the most important component of SEO for images. It is a piece of text that describes the content of a photo, and search engines use that text to understand what is being shown in images. Therefore, using alternative text can help your content appear in relevant search results.

Alternative text also makes your images accessible to screen readers, tools used by people with visual impairments. If you include alternative text, screen readers can tell visitors what your images represent.

You can add alternative text to an image within the WordPress editor . All you have to do is click on your picture, then access the settings panel to your right. Here you will see a field for alternate text:

To further improve the SEO of your image, we recommend that you be as descriptive as possible in your alternative text. Ideally, you should describe to readers exactly what the image represents in one or two sentences.

  1. Add images to your sitemap
    Google recommends adding your images to an existing sitemap . Alternatively, you can create a separate sitemap just for your images.

Regardless of which option you choose, including images in a sitemap allows Google to discover and index your images. This, in turn, can increase your search engine rankings.

Some optimization plugins such as Yoast SEO automatically add images to your sitemap. Alternatively, you can use a plugin to complete the process. Finally, you could contact a professional service or SEO expert to create a sitemap for your website.

  1. Use relevant keywords in your Pinterest images
    In addition to optimizing the images on your site, you may also want to work on any graphics or photos you post on other platforms. This tip is critical if these images link to your website.

Pinterest is still a great source of referral traffic for many sites. This social media works like a search engine. It allows users to find all kinds of useful content, from fashion ideas and do-it-yourself tips to travel guides and recipes:

Even within Google image searches, you are likely to find images that link back to the Pinterest page rather than the source site. If you add images from your site, we recommend that you save them to relevant Pinterest boards so that you maintain more control over your content. We recommend that you provide an informative title and description for each photo:

It is also a good idea to include relevant keywords in your descriptions and titles. These elements can help make your images more visible when Pinterest users (and Google proxy users) search for particular information.

Conclusion
SEO for images is the process of optimizing your site’s visual files. It can help your content rank better in search engines and improve the performance of your website. You should focus on using descriptive image file names, compressing photos, and adding alternative text. And if you’re active on Pinterest, you’ll also want to use relevant keywords for your photos (and if you’re not on Pinterest, you might consider this because it brings a good amount of traffic to many sites).

Cumulative Layout Shift (CLS): how to correct it in WordPress

Are you having problems with cumulative layout shift (CLS) in WordPress?

Cumulative Layout Shift, or CLS for short, is a user experience-focused metric that is part of Google’s new Core Web Vitals initiative .

If you’ve ever browsed a page that “jumps” as it loads, you’ve experienced the layout shift, and you also know how annoying the cumulative layout shift in WordPress can be. But in addition to annoying your visitors, CLS can also affect your search engine rankings, so it’s important to fix any problems with your site.

Fortunately, you don’t have to be a tech wizard to identify and fix cumulative lyout shift problems. By understanding the causes and knowing how to correct them, you can reduce the number of unexpected changes on your website.

In this article, we will introduce you to Google’s cumulative layout shift metric and show you how to detect CLS problems on your site. Then, we will guide you through three simple ways to fix the problems and reduce your site’s CLS score.

What is cumulative layout shift
Layout shift occurs when page content shifts without user interaction.

A common example is late-loading advertisements, which you have probably encountered on multimedia websites. You may have started reading text on the page only to be “pushed” down by an advertisement that is displayed after the page has already loaded.

Cumulative layout shift is a metric that measures all the layout shift that occurs on the page and puts it into a single score. In general, a high score indicates many layout shifts (not good), while a low score indicates few layout shifts (good). And a score of zero means your site has zero layout shifting problems, which is perfect.

As you can imagine, moving elements around can generate headaches for your users. there is a risk that they will inadvertently click on a part of your page or even accidentally make a purchase.

Although there are no direct consequences, many layout changes can be visually annoying. They can also slow down loading times. This seemingly minor problem can have serious repercussions on the user experience (UX) of your audience .

Unfortunately, the problems with a high Cumulative Layout Shift score do not end there. Cumulative Layout Shift is also part of Google’s new Core web Vitals initiative. Starting with the Google Page Experience update, your site’s Core web Vitals scores are now an SEO ranking factor, which means that problems with CLS can affect your site’s ranking .

How to identify problems with cumulative layout shift in WordPress
To find out your site’s Cumulative Layout score and identify problems, we recommend using PageSpeed Insights . It will give you your site’s overall CLS score, but it will also go deeper and flag specific layout shift issues that are causing problems.

To begin, enter your URL in the box and click Analyze . The process should take only a few moments. When you receive the results, scroll down to and look for your site’s cumulative lyout shift score:

From here, you can determine your site’s performance in this area. As a rule of thumb, there are three potential ranges into which your CLS score can fall:

  • Good , which is 0.1 or less
  • OK , which is between 0.1 and 0.25
  • Bad , which is 0.25 or more

Since this metric directly affects the optimization of your Core web Vitals , you should try to aim for as low a score as possible. For more specific suggestions on how to do this, you can scroll down to the Diagnostics section and look at Avoid Significant Layout Changes . This section will list individual layout changes on your site:

This information can help highlight specific areas of your site that may need some work. Once you’ve identified the problem, you can apply some simple methods to fix it.

How to fix cumulative layout shift in WordPress (3 ways)
Let’s take a look at three effective ways to fix CLS problems. These methods are most effective when used together, so we encourage you to try each approach.

  1. Add dimensions to your images, videos, and ads
    If you have different media on your website, chances are that each image and video will have different sizes. This is probably unavoidable, regardless of the type of site you run.

In essence, this variance has no direct impact on your CLS score. However, it still poses a threat: if you do not specify the size of the article, you can run into problems.

Adding dimensions is essential because it provides vital loading instructions to browsers. Size information helps browsers reserve the correct amount of space for that resource.

If the browser is unable to do this, it may be predicting the wrong amount of space. As a result, there may be corrections after the page has loaded, leading to a shift in layout. The same principle applies to ads or any material embedded in your site.

Fortunately, recent versions of WordPress largely take care of this problem. If you insert an image via the WordPress editor, WordPress will automatically handle defining its dimensions for you. You can see the results by selecting any media:

Se aggiungi immagini manualmente con il codice o tramite un plugin, assicurati che le dimensioni dell’immagine siano presenti.

Un altro problema con il CLS su WordPress è la pubblicità. Se inserisci annunci pubblicitari nei tuoi contenuti , dovrai assicurarti di riservare spazio a tali annunci per evitare CLS.

Un modo per farlo è applicare le proprietà CSS min-height e min-width al contenitore

che contiene il tuo annuncio: Google ha una guida su come farlo .

Se ad esempio, visualizzi un annuncio 300x250px all’interno di un div con l’id in-content-ad, puoi prenotare spazio utilizzando questo codice:

INSERIRE IL CODICE DELL’ANNUNCIO QUI

Alcuni strumenti pubblicitari potrebbero anche offrire strumenti per aiutarti a raggiungere questo obiettivo. Ad esempio, se utilizzi Google Ads , Google fornisce un editor di annunci per aiutarti in questo.

  1. Preload your fonts.
    Just as with media, your site probably uses different types of fonts. This means they can also take up varying amounts of space. Unlike media, however, you cannot set exact sizes for fonts.

Instead, the solution is to preload these resources. Preloading fonts signals to browsers that it should be one of the first things it generates for a given page. By including fonts first, you eliminate the need for corrective shifting.

This method can be especially critical if you use many custom WordPress fonts . These can vary greatly in size from normal fonts, which means that this simple change can have a big impact. However, even less font-dependent sites are likely to experience at least a slight improvement in CLS score.

Many WordPress performance plugins include options to preload fonts. For example, Autoptimize, Asset CleanUp, Perfmatters, and WP Rocket.

For most people, using one of these plugins is the easiest way to preload WordPress fonts.

More advanced users, can also preload fonts with custom code snippets. To add this code snippet, you will need to edit the file header.php your child theme . You can edit this file by going to Appearance > Theme Editor > Theme Header on your WordPress site:

After editing the header.php file in your child theme, scroll to the bottom of the page, then copy and paste the following line of code, making sure to replace the sample font link, roboto.woff2 in this example, with the actual link to the file font you are using on your site:


When you are ready, click Update File to save your changes. That’s all you have to do: now your website fonts will have priority loading in browsers.

  1. Optimize your dynamic content
    Finally, let’s talk about your site’s dynamic content. Dynamic content such as newsletter sign-up forms , app installation requests, GDPR notices, and so on can all cause layout changes by adjusting the browser again after the page is almost fully loaded.

However, this only applies to dynamic content that is not triggered by user interaction. For example, if you are loading an automatic notification bar to greet people on your home page, this could hurt your CLS score.

There are two ways to solve this problem:

1.Activate dynamic content only after user interaction, which will not affect your CLS score. For example, instead of showing the email activation form right away, you could activate it when a user clicks a button to create a two-step consent.
2.Use CSS to reserve space for dynamic elements, similar to what was discussed above. For example, if you use CSS to reserve space for the notification bar at the top of the page, you can still load that bar without causing the layout to shift.

Fix CLS in WordPress Forever.
If you want to create a good user experience and improve your score in Core web Vitals, it is important to have a low Cumulative Layout Shift score. Fortunately, preventing this annoying problem is not difficult. You can correct your site’s loading problems by paying attention to a few simple settings.

In this article, we covered three ways to correct and reduce cumulative layout shift in WordPress:

1.Make sure all your media and ads have clearly defined dimensions. WordPress will automatically handle the images you embed in the editor, but you may have to manually define sizes for ads and any images you add outside the editor.
2.Preload your fonts to avoid last-minute changes.
3.Pay attention to how you implement dynamic content, requiring user interaction or reserving space for any dynamic elements.

What is the difference between lossy and lossless data compression?

The use of images can enhance the content of your website. However, file compression is critical to prevent them from taking up unnecessary disk space and hurting your site’s performance. To ensure that you are properly optimizing your images, it helps to understand the difference between lossy vs lossless (lossy and lossless) compression.

In this post, we will start by explaining both clossy and lossless compression. Then we will discuss when to use lossy vs lossless data compression on your WordPress site.

Let’s get started!

Table of contents displays
What is lossy compression?
Lossy compression reduces file size by removing as much data as possible. As a result, it can cause degradation that reduces image quality. In any case, most of the lost information should not be noticed by visitors when using a balanced compression ratio.

Lossy compression has been developed for a variety of file formats. It is most commonly associated with JPEG (Joint Photographic Experts Group) and Graphics Interchange Format (GIF) formats . You can also use this compression method for audio and video files as well.

Below is an example of an image before and after lossy compression. On the left is the original at 389 KB. The image on the right has a 95% reduction in size:

As you can see, there is no visible difference in appearance, despite the significant reduction in file size. However, different levels of compression can affect the quality of compressed images.

The same principle applies to audio files. For example, you can use loossy compression to reduce the size of MP3 files. However, this may reduce the quality of the audio.

Pros and cons of lossy compression
The main advantages of lossy compression are data elimination and size reduction. Creating smaller file sizes can improve the performance and loading time of your site. In turn, this can improve your user experience (UX) and search engine optimization (SEO) .

On the other hand, there are some drawbacks of lossy compression. First, you cannot restore files to their original form. In other words, the process is irreversible. In addition, the deletion of data can affect the quality of the image.

Lossy compression is a trade-off: the smaller the file size, the greater the performance. However, the more data that is lost, the more the image quality will suffer.

What is lossless compression?
Unlike lossy compression, lossless compression does not remove critical data from the image file. Instead, it removes metadata and non-essential information that does not affect the appearance or quality of the image. Although this compression method can help reduce file size slightly, the difference is usually not significant.

Two popular file formats associated with lossless compression are zipped archived files (ZIP) and Portable Network Graphics (PNG) images. Lossless compression has been developed for text, images, and audio. In fact, some of today’s largest streaming services, such as Apple Music and Spotify , use lossless compression for audio files.

Pros and cons of lossless compression
The main advantage of lossless compression is that you don’t have to worry about degrading the quality of an image or making it look pixelated. Also, unlike lossy compression you can restore an image to its original format without any loss of data.

However, there is a significant downside: lossless compression has a lower data retention capacity. Since this compression method does not reduce the size of the data, you will not save as much storage space.

When to use Lossy vs Lossless compression on your WordPress site.
The best compression method for your website depends, in part, on the file formats you use . For example, PNGs are best suited for logos, illustrations, icons, and text with transparent backgrounds. However, most standard images on the web are JPEGs.

We recommend that you use lossless compression for PNGs. In contrast, lossy is more suitable for JPEGs.

WordPress automatically compresses JPEG images (reducing the file size to about 82%) when you upload these images to your media library. You can adjust this level of compression by editing your functions.php file . In any case, we do not recommend this method unless you are familiar with the code.

Regardless of the default settings, you can further optimize your files with lossy or lossless compression. You can use image editing software such as Adobe Photoshop or a WordPress image optimization plugin such as Imagify , WP Smush or ShortPixel .

You can also use a free online tool such as TinyPNG :

Now that we better understand lossy vs lossless compression, it’s time to analyze when it’s best to use each method on your WordPress site. As we have seen, both types of compression have unique advantages and disadvantages.

When to use lossy compression in WordPress
If disk space and bandwidth are among your biggest concerns, it is best to use lossy compression. To speed up your site, Google recommends lossy compression via a WordPress plugin. You can also use GZIP compression to further reduce your files.

In most cases, we suggest using lossy compression for WordPress images. The loss of data is largely unnoticeable, but it can greatly improve loading times. Therefore, this method is ideal for e-commerce shops, portfolio sites and blogs.

Lossy compression can optimize images and product thumbnails in your shop. You can also use it for blog posts and pages with illustrative photos.

Again, depending on the level of compression used, there is usually not a noticeable difference in quality unless you enlarge the images. Also, you can usually choose the level of compression.

The Imagify plugin, for example, allows you to select the optimization level based on how aggressive you want the compression to be:

Lossy compression is best for WordPress images because most people will not see the reduction in quality. Our eyes have varying sensitivity to colors and brightness . Compression algorithms take advantage of the way humans process images to make data removal and quality reduction almost undetectable.

When to use lossless compression in WordPress
Generally, lossless compression is best for images with heavy text and images with transparent backgrounds. We recommend it for RAW, BMP, GIF and PNG file formats.

If image quality reduction is an issue, you may be better off opting for lossless compression. It will keep your images looking sharp while also reducing file size.

Lossless compression might also make sense if your site relies heavily on visual content, such as a photography website. In that case, you can optimize your images and site performance by using other methods, such as leveraging a content delivery network (CDN) .

Conclusion
Optimizing image files is an effective way to improve the speed and performance of your WordPress site. However, it can be difficult to decide between lossy and slossless compression. On the one hand, you probably want to save disk space. On the other, you won’t want to harm the look and quality of your content.

As discussed in this post, both lossy and lossless compression have advantages and disadvantages. We recommend lossy compression for most Web sites because it can significantly reduce file size without removing any obvious data. However, lossless compression may be better if you are more concerned about image quality than loading times.

Domain authority: what it is, why you need it, and how to build it

When it comes to search engine optimization (SEO), it can be difficult to know how well your site ranks and how it compares to sites similar to yours. “Domain Authority” (DA) is an SEO metric you can use to understand how your site is doing on search engine results pages (SERPs) and how it compares to competitor sites.

In this article, we will look at what domain authority is and why you need it. Then we will share five strategies for improving your DA.

Let’s start

What is domain authority (and why it matters)
Domain Authority is an SEO ranking score developed by Moz , an SEO platform. It predicts how well a site will rank on SERPs by considering several indicators, including the number of backlinks to your site and the quality of the sites those backlinks are on.

Scores range from 1 to 100, with sites such as Facebook, Amazon, and Wikipedia ranking above 80 and above. However, DA is meant to be used as a comparative tool , so the goal is to score better than sites similar to yours, rather than to score high.

ASIf, for example, you have an e-commerce site that sells motorcycle accessories, comparing your Domain Authority with Facebook’s would not be an effective measure of your site’s ranking. Instead, you should research the DA scores of other online shops that sell motorcycle accessories and look for ways to raise your score above theirs.

Improving DA so that you can outrank your competitors will help your site appear before theirs within the SERPs. This means greater visibility and more organic traffic for your site. The wider the gap between your DA and your competitors, the more successful your site will be.

Building and maintaining your DA can be complicated, since changes in search engine algorithms and Internet updates can change the way Moz calculates scores. This means that your domain authority could rise or fall without any effort on your part or that of your competitors.

How to build domain authority (5 strategies)
As mentioned earlier, there are several factors that contribute to domain authority, many of which relate to the quality of your ” backlink profile.” The following tips will help you improve your profile and, consequently, your DA.

  1. Perform a backlink audit to find and remove unwanted links
    Backlinks are simply links to your site from other sites. Your “backlink profile” is a summary of all the backlinks on your site, and a backlink audit is the process by which you evaluate your backlink profile. When you conduct an audit, you want to examine the quality of sites that link to your site.

Links posted in spam comments, on shady sites, and in some link directories are considered low quality. Google’s algorithm penalizes sites for these types of links by lowering their rankings. Low-quality links will also reduce your DA, so it is best to remove or disavow them after conducting a backlink audit .

To do this, you must first access your backlink profile through Google Search Console or another backlink analysis resource such as SEMRush.. Your profile will include a list of all your backlinks, as well as information such as the domains linking to your site and the anchor text of your backlinks.

Some red flags include links from untrustworthy or illegal sites and anchor text that does not match the content of the link. Although time-consuming, following each link to make sure it works and is not spam ,is worth it. You can use an automated backlink analysis tool, but they are not always accurate.

Once you have a list of your invalid backlinks, contact the sites where they are located and ask them to remove the links. If they do not respond or refuse to do so, you can disavow the links so that search engines will ignore them when determining rankings.

  1. Create quality backlinks to direct users to your site
    The reverse of removing your toxic backlinks is to build good ones. Just as having low-quality backlinks can reduce your rankings in SERPs, high-quality backlinks from sites with better DA than yours can improve them.

There are several strategies for link building, but not all of them create high-quality backlinks. Buying and selling links or including them in low-quality directories will only lower SEO and DA , so be sure to spend time on good link building.

Internal linking, or linking to your own content, is an easy way to build your link profile. Guest blogging on other sites and reaching out to influencers to review your products or services are also good link building strategies.

Another factor to consider when building links is the difference between dofollow and nofollow links . Dofollow links will be considered by search engines when determining rankings, but nofollow links , such as disavowed links, will not.

When working with another site to build backlinks through guest blogging or collaborating with influencers, make sure they are using dofollow links to your site. Otherwise, all your hard work will be wasted, as nofollow links cannot improve your SEO or domain authority.

  1. Create engaging content to encourage natural link building
    The best way to build a good backlink profile is through natural link building. This occurs when other sites link to yours without any effort on your part. Someone simply likes your content and decides to link to it of their own free will.

For this to happen, you must create high-quality content that people want to link to, either as a reference or to share with others. High-quality content is a broad category, as tastes vary, but there are certain characteristics that tend to produce more linkable content.

First, consider creating long-form content such as blog posts on topics relevant to your core audience. Other bloggers may use well-written posts and articles as references, or readers may share them for their informational or entertainment value.

Including images in your posts breaks up large blocks of text and provides visual interest for visitors to your site. Optimizing image files by compressing them and adding “alt” text ensures that they do not slow down your site and that it will be accessible to anyone who visits.

An engaging call to action (CTA) can draw visitors into your content and encourage them to do more on your site, such as posting comments, making purchases or signing up for your e-mail list. The simpler you make the process, the more likely users are to follow through.

Finally, don’t forget the importance of on-page SEO . It may not seem like much in the face of all the SEO work you have to do, but factors such as keyword usage and page slugs still play a role in improving your rankings

  1. Make sure your pages are accessible to avoid losing new users
    Sometimes backlinks break, meaning that when a user clicks on the link they are instead directed to a 404 error page . This can occur for a number of reasons, including changes to the page name or URL or if the page has been moved or deleted.

Broken links are bad news for your site. They are a missed opportunity to drive traffic to you, so it is critical to find any broken links and replace them with working ones. This can quickly improve your backlink and Domain Authority profile, and is usually easier than building new, high-quality links.

You can find broken external links to your site by conducting a backlink audit just as we indicated in the first strategy. Google Search Console and most other link analysis tools will notice any broken links to your site. Also consider checking your site’s internal links and updating those that are not working.

After you have collected a list of all your broken links, contact the sites where they are located and ask them to replace them with working ones that you provide. If you have changed a URL, you can simply submit the new one.

Alternatively, you can redirect the broken links. This way you will send anyone who clicks on a broken link to the correct page.

  1. Promote your brand on social media to increase your site’s visibility and domain authority
    Having a strong social media presence is not a ranking factor, so it cannot directly impact your SEO. Simply having a Facebook page, Instagram profile or Twitter handle will not increase your rankings or DA. However, social media can improve your SEO in other ways.

Social media offers opportunities for link building, brand promotion, and audience expansion. You can link back to your site in the About section of your profile, include relevant links in posts, and collaborate with influencers to get links to your site on their profiles.

With a larger online presence, you have more opportunities to promote your brand. Not only can you do this work yourself, but loyal visitors to your site will often do it for you. Interacting with your users on social media improves your chances of attracting new visitors.

Increased traffic to your site means more natural links as new users share your content with others. Natural backlinks are almost always of high quality and improve your SEO. They will also refine your backlink profile, as well as your domain authority.

The easiest way to manage a social media presence is to schedule your posts. Some platforms, including Facebook, allow you to do this from within your posts. Others require a social media management platform, such as Hootsuite or Later , to schedule posts.

Conclusion
Balancing all the components to optimize SEO can be tricky. Monitoring your DA-and working to improve it-makes sure your website is at its peak when it comes to SERP ranking. Using DA as a comparative tool to track how your site compares to your competitors can show you areas where your site has room for improvement.

In this article, we looked at what DA is and why it is useful. Then we explored five strategies for improving your site’s domain authority:

1.Perform a backlink audit and remove unwanted links.
2.Create quality backlinks to direct users to your site.
3.Create engaging content to encourage natural link building.
4.Make sure your pages are accessible to avoid losing new users.
5.Promote your brand on social media to improve your site’s visibility.