Enabling comments and contact form messages on your pages and posts is a good way to improve your visitors’ engagement rate. Unfortunately, they are prone to spam messages, usually consisting of random advertisements and suspicious links that direct to irrelevant Web sites.
If left unchecked, spam can adversely affect user experience and harm ‘search engine optimization (SEO) . Web crawlers see spam comments as red flags, and Google may even remove the content from its search results.
An effective way to block spammers from your WordPress site is to install an anti-spam plugin, such as Automattic’s Akismet AntiSpam .This article will discuss everything about the plugin, including its use, key features, and the installation process.
Table of Contents view What is Akismet Anti-Spam plugin?
Akismet Anti-Spam plugin is a cloud-based application that filters out spammers on your WordPress website. Developed by the same company behind WordPress.com , this plugin has more than 5 million downloads .
Akismet has several important features, such as:
Scanning your blog, comments and contact forms.
Displaying URLs in the body of comments to identify misleading links.
Setting up a status history for each comment to help identify whether it was deleted by Akismet or a moderator.
Allow moderators to configure spam parameters such as keywords and links.
Deletion feature to block significant spam messages, saving disk space and speeding up your WordPress site.
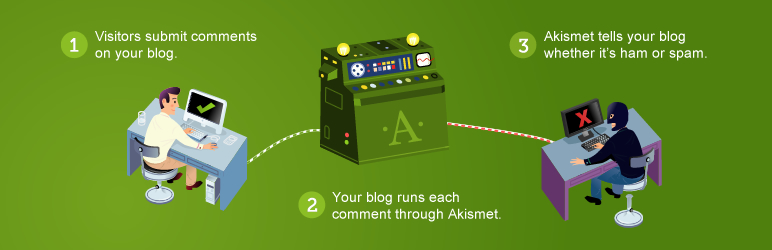
Akismet identifies WordPress spam comments using anti-spam algorithms. Whenever a user posts a comment, Akismet examines it against its database. If the algorithms identify a comment as spam, it will be removed from your website.
The algorithms also learn from actions taken by users to identify spam e-mail addresses. For example, when many users flag a specific comment as spam, Akismet will automatically mark it.
Akismet also allows users to filter comments manually: the algorithms will then record this action and use it to filter real user comments from spam comments.
However, there are cases when algorithms accidentally identify legitimate users as spammers. This problem occurs when a user’s comment is marked as spam on other sites, resulting in false positives. To prevent this from happening, check the moderation queue regularly.
Why use Akismet anti-spam WordPress? If you do not wish to activate an anti-spam plugin, you can perform manual comment moderation to prevent comment spam on your WordPress website . Having said that, however, remember that it is a time-consuming process and is prone to human error.
For this reason, installing a plugin is a better alternative. The tool can quickly identify hundreds of comments, forms and posts and then eliminate those that include spam.
Akismet Anti-Spam is our best recommendation among other spam-blocking plugins. Here’s why:
Reliable : The plugin has blocked over 500 million spam comments to date. With such a large database, it is getting better at distinguishing spam comments.
Integration with Contact Form 7 : by combining these two platforms, the Akismet service can further improve the security of your site and block contact form spam.
Statistics monitoring : This feature provides data on your site’s spam activity. It displays monthly and annual spam graphs.
Easy to use : the plugin comes by default on WordPress installations. This allows you to easily configure and activate it.
With its wide variety of features that reduce manual comment moderation, Akismet allows you to focus on creating content and managing the rest of your website.
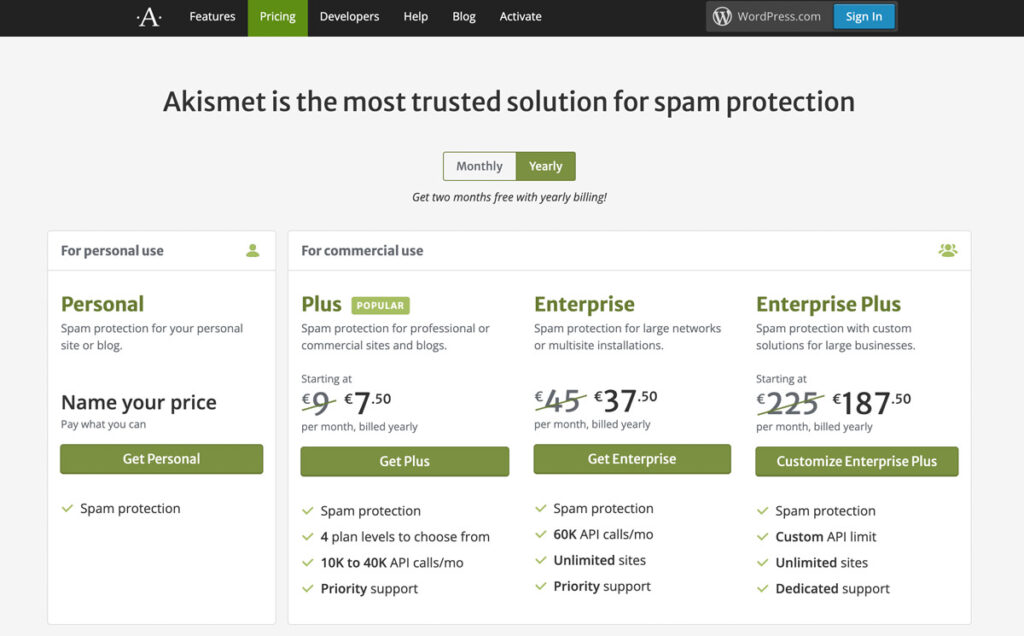
Akismet Anti-Spam also offers a freemium pricing model, so you can purchase premium features and increase its performance. There are dedicated plans for both personal and commercial use, starting at $8.33/month .
How to configure Akismet plugin Akismet Anti-Spam comes as a default application with a WordPress installation. However, the plugin requires an API key upon activation. The following sections will guide you through an easy way to configure Akismet and get it working on your site.
Install and activate the Akismet plugin. If the plugin is not already installed on your WordPress site, go ahead and locate it in the plugins directory.
1.Log in to your WordPress dashboard and go to the Plugins menu . 2.Select the Add New option and type “Akismet Spam Protection” in the search bar. 3.Click the Install Now button to start installing the plugin . Once the process is complete, press Activate . 4.Upon activation, the software will prompt you to enter an API key in the field provided.
5.Keep this window open and follow the steps below to obtain an API key for the Akismet Anti-Spam plugin.
Get the Akismet anti spam API key. An API key functions as a password for your Akismet account and helps the server recognize you as an authorized user.
With this in mind, it is essential to keep your API key secure to prevent any misbehavior.
Users can use the same API key for more than one WordPress site, depending on the subscription plan. To get yours go to the Akismet website .
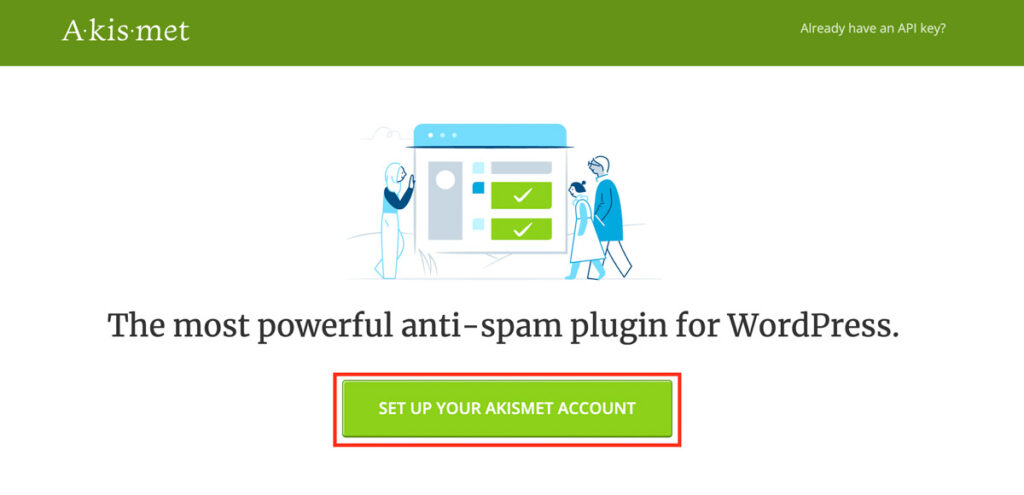
1.Click on the Configure Your Akismet Account button to start setting up your account.
2.Choose a subscription plan. There are paid subscriptions for larger projects or companies and a free version for personal use.
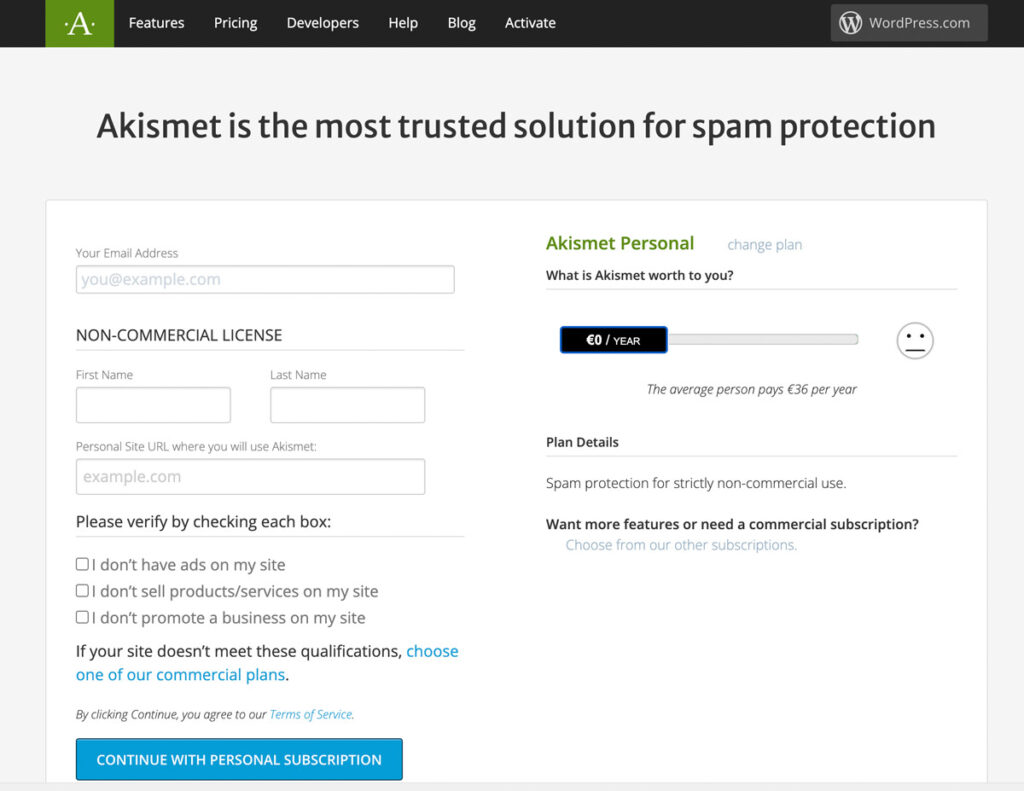
3.If you have a personal website that does not show ads, sell products, or engage in sales promotions, you can choose the free option. To do so, click on the Get personal button and drag the price bar to $0 . 4.Fill in your information in the fields provided. Then, check all the boxes. When finished, click Continue with personal subscription.
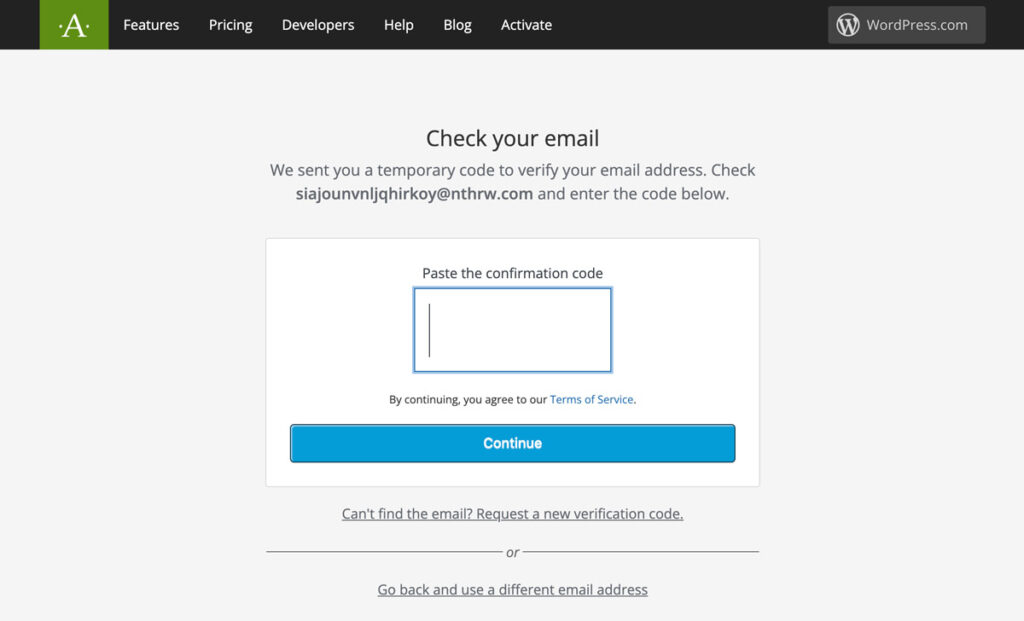
5.Akismet will send a verification code to your registered email address. Check your email and return to your account page. 6.Enter the confirmation code in the field provided, then press Continue.
Add the Akismet anti spam WordPress API key. Once the email has been verified, Akismet will send a message containing your API key. Follow these next steps to connect your WordPress site with Akismet Anti-Spam.
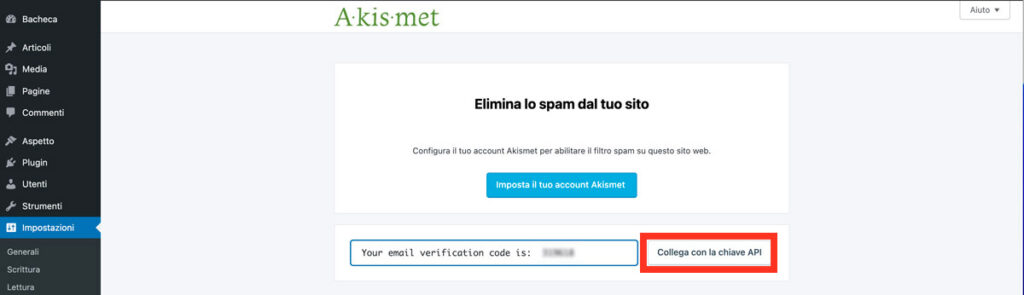
1.Go back to the activation page on the akismet WordPress dashboard. You can also go to the Plugins menu then to Installed Plugins , locate the Akismet plugin and press Settings .
2.Enter your API key and click the Link with API key button .
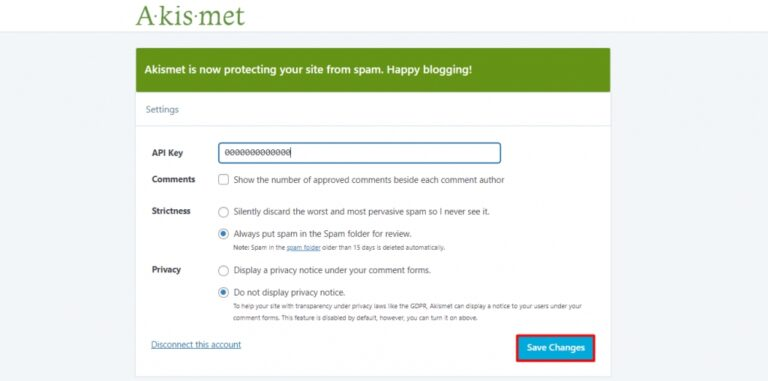
3.Configure your preferences and save all changes.
Akismet Anti-Spam has been successfully added to your site. The plugin will automatically start scanning for spam comments and forms on your site as soon as it is activated.
Tracking spam with Akismet Akismet Anti-Spam also allows you to monitor spam activity on your WordPress site. With the free version, you will view basic statistics, such as the total number of spam, lost spam, and false positives.
In contrast, subscribing to Akismet Plus and later versions gives users access to Advanced Statistics , a comprehensive report on your account data and diagnostics to identify problematic aspects of your site.
To view your Akismet statistics, go to your account page and scroll to the bottom to find the Recent Active Sites menu .
Clicking the highlighted button will take you to the Akismet statistics page . You can choose to view monthly or annual data depending on your subscription plan.
In addition to helping users analyze plugin performance, these statistics are useful for monitoring multiple active websites. The data allows you to monitor your spam levels and take immediate action whenever suspicious activity occurs.
Conclusion Spam comments or messages are unsolicited responses from both automated bots and human spammers. This problem will become inevitable as your website traffic increases and attracts unwanted attention.
These comments can damage your site’s credibility, reputation, and security. A spammer can also leave malicious links in the comments section and damage your site’s SEO. Fortunately, WordPress provides several anti-spam plugins.
One of the most reliable plugins for blocking WordPress spam is Akismet Anti-Spam . It has a large global database and uses advanced anti-spam algorithms.
To recap, let’s go through each step required to activate Akismet:
1.Install Akismet Anti-Spam on your WordPress site. 2.Sign up for one of the subscription plans to get an API key. 3.Connect Akismet to WordPress using the API key. 4.Monitor your site statistics from your Akismet account page. We hope this article helps answer any questions you may have about the Akismet Anti-Spam plugin.
Although the aesthetics of a website are important, its content and loading speed keep people coming back. WordPress provides users with a sophisticated toolbox of plugins and themes to quickly create their own customized websites.
However, these themes and plugins require JavaScript (JS) and Cascading Style Sheets (CSS) to work. WordPress automatically creates them as script files. They are often poorly optimized. As such, they can slow down your website considerably.
This can be frustrating for your readers. Therefore, in this guide, we will explore how to find and remove these rendering-blocking scripts and show you how to increase the loading speed of your WordPress website.
What are JS and CSS rendering-blocking scripts and why are they harmful? Most web pages on the Internet are composed of three key components: JavaScript, CSS and Hypertext Markup Language. HTML serves as the base , while JavaScript and CSS are embedded in it. However, these days, it is more conventional to embed calls to external scripts in the HTML document.
These scripts are kept in a queue that your web browser uses to render the web page. The easiest way to see what scripts a web page uses without reading the source code is to download them from the web browser (Ctrl + S). The web browser will download the HTML document along with a folder with all (or most) of the scripts, images, and other files used by the web page.
The more complex scripts your web page has to call from the queue, the longer it will take to render. Web browsers often download web page resources such as scripts and images into a local cache to load web pages faster. Although client-side users can speed up web page rendering times by disabling JavaScript , increasing cache sizes, and using AdBlockers, this is not an ideal solution. The responsibility should lie with the web developer.
If you receive complaints or have noticed that your website is having problems displaying its content, it is not too late to fix it.
How to optimize your website by finding and fixing rendering-blocking scripts Before deciding which scripts to terminate or optimize, you need to evaluate the speed of your website or web page. You can use an online platform such as GTmetrix or Google PageSpeed Insights. All you will be asked to do is enter the URL of the website or web page you wish to test, and the tool will evaluate it and provide other insights.
These tools will also suggest audits that you can use to make your website faster. They will suggest, for example, that you use fewer elements in your web page or reduce unused CSS and JavaScript. GTmetrix will show you which scripts need to be optimized.
Alternatively, you can use the Coverage tab of Chrome DevTools to view your script usage data. Once you have identified which scripts are suboptimal, you can do several things to fix them. However, these steps will require some code knowledge to implement them successfully. You will at least need a basic knowledge of functional JavaScript programming.
Taking a coding course (or bootcamp) is a good idea to further develop your skills. On average, a programming bootcamp can take up to fifteen weeks to complete, and although it may seem like a lot , it is worth it when you consider how basic code literacy is an important skill to have in the modern world. However, here are five ways to fix rendering-blocking scripts and increase the speed of your web page.
Optimize the loading order The head section ( ) of the web page is used for preloading elements. The base of your web page should go here, so a blank screen does not greet the user when loading your web page. Although embedding CSS here is fine, you should avoid embedding JavaScript.
Once you have optimized the head section, you need to optimize the body of the page. Most web browsers render web pages from top to bottom. You need to sort calls to scripts according to their importance and complexity. You should make calls to scripts that are notfundamental to rendering the web page last along with complex scripts that take time.
Minimize code Code minimization involves rewriting and eliminating unnecessary characters such as whitespace, comments, commas, line breaks, etc. This makes the code more concise and compact, which ultimately reduces the size of the script and increases the loading time of your web page.
Plugins and tools such as WP Rocket have modules that minimize JavaScript and CSS in your themes. Alternatively, you can manually minimize your script code with a free online tool such as JavaScript Minifier.
Use deferred and asynchronous loading of JavaScript. Web browsers read code from the top down. When they encounter a script tag, they stop loading the web page and read the script file. This slows down the rendering of the page.
You can use the ‘async attribute to load the script in parallel with the web page and execute it as soon as it is available. Alternatively, you can use the defer attribute to defer script parsing. This means that it will also load the script in parallel with the web page, but will only execute it when the browser parses the web page.
It is recommended not to use the async or defer attributes on scripts used for rendering and displaying visual elements. The JavaScript keywords equivalent to these attributes are the keywords async and await . You can use them to load your JavaScript asynchronously without changing the HTML tags on your web page.
Replace JavaScript visual elements with CSS3. In the past, CSS was not as versatile as it is today.CSS 1.0 and 2.0, for example, lacked UI tools such as basic controls and sliders.
Then CSS3 came along. It introduced new colors, box shadows, opacity, etc. JavaScript is great for adding complex controls to the user interface but is heavier than CSS.
Therefore, using an excessive amount of JavaScript slows down your website considerably. If you notice that your web page is using JavaScript to do the job where previous versions of CSS have failed, you should modify it and replace all unnecessary JavaScript with CSS where you can. This will allow web pages to load faster.
Eliminate all unnecessary scripts The purpose of JS and CSS is to expand functionality to web pages and add logic where HTML cannot. However, HTML 5.3 came with new tags that would make some CSS and JS operations unnecessary. Using HTML instead of scripts speeds up the loading of your web pages.
So the best way to optimize the speed of your website is to eliminate all underutilized scripts. You will have to analyze which scripts are completely unnecessary and remove them. Again, you can use the Coverage tab of Chrome DevTools or GTmetrix to find the most underutilized scripts on your web page and then remove them.
After removing all unnecessary functions or tags, you can combine scripts whose functions are similar. If you already know how to mannipulate the source code of your web page, this should not be a difficult task for you. However, users who are not so experienced or knowledgeable in web design should not worry. WordPress makes it easier for you to identify scripts on your website and modify them using various optimization plugins that we will see in a moment.
Use plugins to optimize your WordPress website. Once again, you do not need a working knowledge of programming to optimize your WordPress website. although some experience would help. However, there is a range of plugins geared toward script optimization. Some of them use artificial intelligence to minimize code, change the loading order and replace underutilized scripts with more efficient code and scripts.
Some of the best script optimization plugins include:
WP Rocket : This is one of the most popular plugins for web optimization. It can automatically detect which scripts create problems and fix them for you. You can use it for quick caching, compression and minimization.
Autooptimize : can defer and delete non-essential scripts, integrate inline CSS and minimize scripts, HTML and images. Autoptimize is highly customizable via an open API and advanced options.
W3 Total Cache : This plugin requires some work to use. You will have to manually track and identify scripts before removing or modifying them. In most cases, this plugin is already available with your WordPress package.
Async JavaScript : an open source plugin presented by WordPress. It allows you to detect JavaScript that blocks rendering and then resend or load it asynchronously.
So why didn’t we simply recommend plugins right away? Because, some of these plugins require an investment. For example, Autoptimize costs $49 per year. While this is a reasonable rate, it may not be ideal for those who are already investing a large sum of money for hosting, other applications, and plugins.
However, regardless of whether you are using plugins or found the scripts manually, you need to understand concepts such as minimization, asynchronous loading, and loading order. It will make it easier for you to troubleshoot any loading problems if one of your scripts fails.
Are you experiencing a bounce while trying to send email from your hosting account? This can happen due to PTR record errors on your DNS . In this tutorial, we will see what a PTR record is and how to check if your IP address has one with a PTR lookup.
Let’s get started!
Table of Contents displays What is a PTR record? A PTR record is known as the reverse version of an A record . While the A record associates the domain name with an IP address, the PTR record associates the IP address with a hostname. Thus, the PTR record ensures that your IP address officially connects to your host.
Configuring the PTR record is essential if you use internal or external mail servers. This record adds reliability to the sending servers and allows the recipient to control the hostname of your IP address. It is a great way to protect against all kinds of spammers.
That’s why some of the major e-mail providers such as Yahoo Mail and Gmail perform a Reverse IP Lookup before accepting incoming e-mail.
Two methods to check the PTR record and reverse DNS lookup. Perform the following methods to see the value of your domain’s PTR record and make sure you have set up a reverse IP lookup:
Using computer consoles Check whether or not the IP address is resolving to the host name by checking the value of the PTR record through your computer consoles.
If you are using Windows, run this syntax from the command prompt:
nslookup IP_ADDRESS Change IP_ADDRESS to the IP address of your domain.
Suppose you want to run a PRT lookup for 54-243-154-xx. Then you will see this:
As you can see, the PTR record is ec2-54-243-154-xx.compute-1.amazonaws.com.
The process is similar if you run it on the Linux console terminal or MacOs terminal. Run the PRT search with the following command:
From the ANSWER SECTION, you can see that the value of the PTR record is ec2-54-243-154-xx.compute-1.amazonaws.com.
Using online tools Alternatively, you can use online ip reverse lookup tools such as MxToolBox to find out the hostname of the IP address. All you have to do is enter the IP address in the field and press the Reverse Lookup button .
Conclusion As we have seen, a PTR record is the reverse version of your domain IP address. It confirms that your IP address connects to a hostname.
If your IP address does not point correctly, you need to set up a PTR lookup on your hosting provider. This way, you will be able to avoid email bounces!
If you spend any amount of time browsing the World Wide Web, chances are you have come across the word e-commerce.
E-commerce stands for electronic commerce and refers to all transactions completed electronically. This includes various online tools and activities, from Internet banking and e-wallets to online ticket sales and auctions.
However, when people talk about e-commerce, they usually refer to online shopping: buying and selling goods over the Internet. A good example of an e-commerce platform is Amazon , the largest online marketplace in the United States.
If you are interested in starting an e-commerce site to sell online, this article may be for you. We will explain all about ecommerce shops: how profitable they are, the main ecommerce business models, the different types of products and services to sell online, and the advantages of ecommerce businesses.
Without further ado, let’s begin.
Ecommerce trends: how profitable is ecommerce? The ecommerce industry is growing all the time. Here are some noteworthy statistics on the growth of ecommerce businesses:
In 2020, online sales accounted for more than 18 percent of all retail sales worldwide. It is expected to continue to grow and reach 21.8% in 2024.
The pandemic has led to an overall growth of $183 billion in online spending, and the figure is expected to grow to $1 trillion in 2022.
Experts predict that e-commerce will account for 95 percent of all purchases by 2040.
In short, the e-commerce industry has inevitably become an inseparable part of many people’s lives.
The 4 main models of an e-commerce business There are many ways to classify ecommerce businesses. This article will group ecommerce websites into four online marketplace segments based on the participants involved in the transaction.
The following are the four main types of ecommerce by business model:
E-commerce Business to Consumer (B2C). The B2C model refers to businesses that sell products and services directly to end users.
They come in various forms, such as:
Retail : when a business sells goods or services directly to consumers for their own use, rather than reselling them to third parties. Think of buying a phone from Apple , ordering a pair of Adidas shoes.
Dropshipping : merchants do not have to maintain inventory themselves. The seller purchases an item from a third-party supplier, who ships the item directly to the buyer. a Ease of management and low capital are some of the reasons why many small businesses have adopted this model. Examples of dropshipping providers include Megagoods and Sunrise Wholesale .
Crowdfunding : This model requires encouraging people to fund a new business or product in exchange for a reward. The reward can be a small gift, a monetary interest, or shares in the company. Some examples of crowdfunding platforms are GoFundMe and Kickstarter .
E-commerce Business to Business (B2B). In the B2B model, both participants are business entities. Typically, this transaction occurs when a business needs to source materials to create products.
Let’s take automobile manufacturing as an example. In this case, an automobile dealer buys from manufacturers. B2B transactions might include the purchase of tires, rubber hoses, and windshield wipers, materials to build cars that will be sold to customers.
As a result, B2B e-commerce transactions typically result in more recurring high volume sales and purchases.
Wholesale e-commerce falls into this category, where companies sell products in bulk and at low prices to online retailers instead of selling directly to end users.
Some examples of business-to-business companies include Berlin Packaging , Flexfire LEDs and Bulk Bookstore .
Consumer to Business (C2B) E-commerce. C2B businesses allow people to sell goods and services to businesses. This approach gives consumers the power to choose their own prices.
To clarify , affiliate programs and freelance sites are classified as C2B.
An affiliate program is a marketing system in which a company pays someone to promote its goods or services. Companies are willing to pay for promotion because the affiliate is usually a well-known person in the industry and a following of loyal users.
Companies typically offer affiliate marketers unique links that they place on their websites. Each time a reader clicks on the link and is directed to the company’s website or online store, the affiliate receives a commission.
In contrast, a freelancer sells their services to businesses. Freelancers can come from virtually any field, from web development to financial services.
Transaction flow can vary from one platform to another. Some may require companies to contact freelancers first, while others allow companies to hire freelancers immediately without prior correspondence.
As such, e-commerce websites such as Upwork , Hubstaff Talent and Fiverr belong to this model.
Consumer to Consumer (C2C) E-commerce. The C2C business model connects consumers online, enabling one individual to sell to another individual. Similar to other models, the C2C model can be used to sell both goods and services. Many people also use this method to sell handmade or second-hand products.
This process usually takes place in online markets that achieve a reduction in profit. Examples of B2C e-commerce websites that help customers sell to other consumers by registering an account include Etsy and Craigslist .
Some e-commerce platforms such as eBay also allow customers to sell products through online auctions instead of a simple purchase.
The merchant puts a product up for auction for a certain period and people can bid on it. At the end of the auction period, the buyer willing to pay the largest amount of money can buy the product.
In addition to e-commerce sites, C2C transactions can also take place through money transfer platforms such as PayPal or social media sites such as Instagram or Facebook .
Types of e-commerce businesses based on goods and services sold The following are the types of business ideas and services that e-commerce stores can offer:
Physical products. These are tangible items, such as clothes, beauty products, jewelry, food, cars, and computers.
Digital products. Non-tangible products, such as mp3s, eBooks, online courses, and computer software.
Services. When people offer their skills to do a specific type of work and are paid by project or time. Examples of people who offer online services include graphic designers, web developers, and translators.
Online businesses can offer these products and services through a one-time purchase or a subscription system.
A one-time online purchase means that the transaction occurs only once. The transaction is complete when a customer purchases a T-shirt and the item is delivered to him or her.
In contrast, a customer will pay for a product or service monthly or annually with a subscription system. The buyer can use a service or have products delivered regularly for the period for which he or she has paid.
Another example is a meal kit delivery service such as HelloFresh . This online business offers customers pre-portioned ingredients and corresponding step-by-step recipes every week. Customers can also adjust meals according to their diet type and choose the number of recipes per week.
What are the advantages of opening an e-commerce business? There are many advantages to entering the growing e-commerce industry.
Here are some reasons why setting up an ecommerce site may be better than the traditional physical store business.
Ecommerce unlocks the global marketplace Ecommerce overcomes geographic barriers. It allows merchants to increase revenue by selling to anyone, anywhere. Online shopping is also made even easier by the prevalence of mobile devices, which contribute to the growth of ecommerce.
Both global e-commerce and mobile commerce have grown steadily over the years. Global mobile commerce sales from retail are expected to exceed $132 billion by 2024, while global e-commerce sales are expected to reach $5.4 trillion by 2022 .
An online shop makes products easier to discover and purchase, enabling small businesses to sell trendy products on a scale impossible to achieve with a physical store.
In addition, an online store not only has wider market coverage, but also eliminates the need to open physical stores. With physical businesses, you have to create inventory, rent store space, and hire employees. With ecommerce businesses, on the other hand, you can start building an ecommerce store as soon as you know what to sell and are ready to go online.
Open 24/7/365 Having your business on the Internet means you are always ready to sell.
An online store increases sales opportunities for merchants. Unlike a physical store, your income has no opening hours. In addition, 87 percent of shoppers start looking for products online, so setting up an online shop will expose your business to a wider audience.
For shoppers, online shopping provides them with instant gratification. Regardless of the time of day, consumers can shop online via desktop or mobile device. With just a few clicks or touches, the product can be theirs.
This convenience is especially beneficial for those who cater to a global audience. You never know what time zone people are in, and being open 24/7 reduces your chances of losing customers.
To further maximize customer satisfaction, use chatbots in your online store to provide 24-hour customer support.
Low operational costs In addition to eliminating the need to build or rent physical stores, starting an ecommerce store also reduces several operational costs.
When selling online, you can save on warehousing and product storage costs by choosing a dropshipping business model. Let the supplier fulfill orders for you.
Depending on the e-commerce platform you choose, setting up an online store can also be quite cost-effective.
Online advertising is also cheaper than traditional channels. Many online advertising platforms are available, such as Facebook , Google and Instagram .
In addition to paid advertising options, there are also free methods to market products. Examples include creating organic social media or blog posts and improving your site’s search engine optimization (SEO). Don’t forget to adjust your marketing strategy to meet your budget.
In addition, you can eliminate the cost of staffing by starting and running the business yourself. Even if you need staff, you won’t have to hire many employees, thanks to the advanced features available in various e-commerce solutions. We will discuss this further in the next section.
Easier management E-commerce businesses can automate inventory management with the help of tools and services. They simplify and facilitate the operational tasks associated with running a business.
For example, you can add, track, and manage product inventory from a single page.
Shipping and delivery details are also taken care of with real-time calculation tools. Therefore, there is no need to create a manual table shipping rate. Ecommerce platforms also typically offer a variety of payment options, and customers can choose one they are familiar with.
Some ecommerce platforms even come with customizable, professionally designed default templates, so there is no need to hire a graphic designer. Choose the one you like best for your ecommerce site and adjust the elements to your liking.
With the right e-commerce platform, you can easily achieve efficiency and productivity, thus focusing more on growing your business. In addition, using the right platform means that your ecommerce store is more likely to deliver an exceptional user experience to customers who shop online.
Descriptive Information and Personalized Lead Targeting With a physical store, you can only display a limited amount of information about each product.
This is not the case with an ecommerce store. You can add detailed descriptions about products or services and display as many product variants as you want. Entrepreneurs can even provide complete information about the history of their brands to build credibility and gain customers’ trust.
These small features might seem insignificant, but they can encourage online shoppers to buy. According to one study, informed customers feel more satisfied and confident in their purchase decision.
Having an e-commerce business also allows you to use lead targeting strategies, such as personalized email marketing or targeted advertising campaigns.
Because your online store can collect customer data, you have the ability to do personalized marketing depending on the customer’s information, whether it’s purchase history, gender, or age.
By understanding your target audience, you have a better chance of increasing conversion rates. Use customer data to offer different types of marketing content and personalized recommendations to different demographic groups.
Examples of successful e-commerce sites To help inspire you and give you a better understanding of what an e-commerce site might look like, let’s take a look at some of the best e-commerce companies in the industry.
Amazon
One of the largest players in the industry, Amazon is an American technology company and online retailer. The fields it focuses on include ecommerce, digital streaming, cloud computing, and artificial intelligence.
Amazon.com has numerous subsidiaries that provide various products and services. Examples include Amazon Fresh, a grocery delivery service that operates in the United States, and Amazon web Services, a subsidiary that provides APIs and cloud computing platforms.
Walmart
Another American retail company, Walmart provides virtually any product or service imaginable. Examples of some of the trendy products it sells include gardening tools, office supplies, movies, and books. This company also provides services such as health care and automotive services.
One of the reasons for its success is its principle of offering low prices to its customers. Walmart achieves this through various methods such as minimizing operating costs, advanced barcode technology and supply chain management, and its direct cooperation with various manufacturers.
Alibaba
Also known as Alibaba Group, Alibaba is a Chinese online retailer and technology company that focuses on various market segments of e-commerce, search engines, and cloud computing services.
It has a variety of subsidiaries to drive its online efforts in different niche markets. For example, Alibaba.com is an online marketplace focused on B2B wholesale transactions, while AliExpress caters more to B2C transactions. There is also Taobao, an ecommerce platform available only in Chinese created to facilitate C2C ecommerce transactions.
Read also: Alibaba vs AliExpress: which is better for dropshipping in 2022?
eBay
This American ecommerce company focuses on B2C and C2C transactions. In addition to allowing immediate purchases, the unique quality of this online marketplace lies in its auction function, which allows users to bid for a specific period of time.
The e-commerce website allows people to buy and sell various types of products, including electronics, beauty products, industrial equipment, clothes, and sports equipment.
Read also: eCommerce security: how to protect your shop from cyber attacks
Conclusion To recap, although the term ecommerce can refer to all types of e-commerce transactions along with related tools and activities, it mainly refers to online shopping. As an industry, it is expected that global ecommerce will continue to be a profitable source for earning online . Examples of successful online stores include Amazon , Walmart , Alibaba and eBay .
We addressed four ecommerce business models:
1.Business to consumer (B2C). Online retailers sell online directly to end users. Business to business (B2B). Wholesalers sell products in bulk and at lower prices to ecommerce retailers. 2.Consumer to business (C2B). Individuals offer services and expertise to businesses. 3.Consumer to consumer (C2C). Individuals offer products and services to other individuals, either through one-time online purchases or through an online auction system. 4.Online stores can also sell both physical and digital products and services. Online buyers can purchase products and services through a one-time purchase or subscription system. In addition, we explained the advantages of starting an online store instead of a physical one:
The ability to sell to international customers.
A 24-hour business.
Lower operating costs.
Practical tools for easy store management.
More detailed product descriptions and personalized marketing.
Whatever model you choose and whatever product or service you plan to sell, don’t forget to choose the right ecommerce platform for your needs. We hope this article has been helpful in helping you get started on your Internet commerce journey.
If you decide to open an ecommerce business and have your online shop built by professionals in the field contact us for information or request a totallymemnte free ecommerce quote.
One of the best ways to improve the front-end functionality of your website is to add custom JavaScript to WordPress. However, figuring out how to do this can be tricky, especially if you are used to working with the Customizer to insert custom CSS.
Fortunately, you can use different strategies depending on your level of experience and what you are trying to achieve. After learning what your options are, you will be able to choose the solution for adding custom JavaScript to WordPress that makes the most sense for you.
In this post, we’ll walk you through three methods you can use to add custom JavaScript to your WordPress site, as well as discuss the pros and cons of each option.
Let’s get started.
Table of Contents hide
Install a plugin like Head & Footer Code. Pros and cons of using a plugin
Use your functions.php file Pros and cons of editing your functions.php file
Add JavaScript to your header Add JavaScript to your header using the wp_enqueue_script function. Add custom JavaScript using the wp_head hook Pros and cons of adding JavaScript to the header Conclusion
Install a plugin like Head & Footer Code. Using a plugin is one of the easiest ways to add JavaScript to WordPress. Head & Footer Code, for example, is a great tool:
This free plugin allows you to insert code in various ways. You can use it for Facebook Pixel , Google Analytics , custom CSS and more.
To get started, add the plugin to your site by navigating to Plugins → Add New from the admin dashboard, then search for “Head & Footer code.”
After clicking the Install Now and Activate buttons , you can locate the plugin settings by going to Tools → Head & Footer code . On this screen there are three boxes for the header, footer and body sections:
You can enter your custom WordPress JavaScript in one of these boxes. When finished, select the Save Changes button at the bottom of the screen. The code will then be loaded on every page of your site.
Pros and cons of using a plugin The main advantage of using a plugin is that it is a beginner-friendly option. You don’t have to worry about editing your theme files . The Head & Footer Code plugin might also come in handy if you are looking for an easy way to add other types of code and custom CSS.
However, the disadvantage of this method is that it involves installing a third-party plugin, a solution that some site owners want to avoid. If you want to keep your plugins to a minimum, you might do better by using one of the other methods. Also, the plugin is designed for site-wide JavaScript changes rather than specific pages or posts.
Use your own functions.php file. Another method for adding custom WordPress JavaScript to your website is to take advantage of the built-in functions and hooks to modify the functions.php file . This approach involves manually uploading scripts to the server.
Before you begin, we recommend that you create a child theme . This step ensures that you will still be able to update the main theme safely. You should also make a backup of your site in case something goes wrong.
This method involves using the IS_PAGE function . You can add conditional logic to apply your custom JavaScript code to a single article or page.
To begin, locate and open your functions.php file , then copy and paste the following code snippet:
This code will add the JavaScript code to your header. To apply it to a single post, you can use the following:
Keep in mind that you will need to replace the number 3 in the example above with the ID number of the post to which you want to add the code. To locate that number, access the post from the admin dashboard, then click Edit . In the URL in the browser bar, the ID number is the number next to “post=”:
Save your file once you have replaced the ID number and add your custom JavaScript to the designated area. You can also repeat the same process for a single WordPress page.
Pros and cons of editing the functions.php file. One advantage of editing the functions.php file is that you do not need to install another plugin. You can also use this technique to add features and functionality to both your theme and WordPress itself. This method can insert JavaScript into a single article or page or into all pages.
The only downside to this method is that it involves working with code and modifying files on your site. Therefore, it may not be the best option if you do not have experience in this department.
3.Add JavaScript to your header
Next, locate and open your functions.php file , then copy and paste the following code snippert:
Be sure to replace the template URL with your own. Finally, save your file.
Add custom JavaScript using the wp_head hook You can also use the wp_head action hook to add custom JavaScript to your header via inline scripts. Again, this method is not preferable because it can create too many scripts. In any case, it is better than directly inserting scripts into the header.php file .
This method, which you can also use for the footer, uses action hooks to add inline scripts to your site. While wp_enqueue_script queues custom scripts, the wp_head approach prints scripts in the header template (and footer, if you use the wp_footer hook ).
To get started, go to the functions.php file , then copy and paste the following:
Note that the wp_head hook only activates on the front-end of your Web site. This means that any custom JavaScript you add using this method will not appear in the admin or login areas. However, if you want to add JavaScript to those areas, you can use the admin_head and login_head action hooks, respectively.
Pros and cons of adding JavaScript to the header The wp_enqueue_script function is preferred by developers because it prevents conflicts that can arise with other options, such as directly adding scripts to the header.php . Also, using this method does not create dependent scripts.
The main problem with adding custom WordPress JavaScript to your site’s header is that it can cause problems with other plugins loading their own scripts. This configuration can also cause multiple scripts to load more than once, which can hinder the speed and overall performance of your website
Conclusion By default, WordPress does not allow you to insert JavaScript code fsnippets into your pages and posts. Fortunately, with a few tricks you can add your own custom JavaScript without harming your WordPress website. The best method depends on your level of knowledge with editing your site’s files and where you want to apply the scripts.
As we have seen in this post, there are three ways to add custom JavaScript to your WordPress site:
1.Install a plugin like Head & Footer Code. 2.Use your functions.php file to add custom JavaScript to a single page or post.Add JavaScript for the header using the wp_enqueue_script function the wp_head hook. 3.Now that you know how to add custom JavaScript to WordPress, you may also be interested in our other guide on how to add custom CSS to WordPress.
As the e-commerce market grows , so do concerns about privacy and security. According to research , 34 percent of respondents believe that cyber attacks or privacy breaches are the main digital threat.
It is easy to see why, considering that hackers are constantly trying to find holes in a website’s security to access user data.
In addition, the U.S. National Cyber Security Alliance found that 62 percent of all cyber attacks affect small online businesses. Therefore, the implementation of e-commerce security protocols is necessary to maintain a secure selling and buying environment.
In this guide, we will explore common eCommerce security threats and provide tips on how to protect your site .
Table of Contents view The basics of e-commerce security Ecommerce security refers to protecting a business website and all online transactions that occur on it from unauthorized access. Therefore, you need a solid security foundation to have a secure and reliable online shop so that you can make money online without any problems.
Whether you are building a site on an eCommerce platform or a CMS, there is no one-size-fits-all approach to protecting your site from possible security problems. There are numerous regulations, standards, and industry solutions that you can follow to minimize security risks.
Below are the six e-commerce security factors that must be considered:
Integrity-ensuring that no unauthorized entity has altered any information. This involves providing consistent, accurate and reliable information.
Non-disclosability – confirming that both buyers and sellers have received the information sent by each other. In other words, buyers cannot deny the legitimacy of a registered transaction.
Authenticity – both sellers and buyers must submit their identity verification to ensure the security of the transaction.
Confidentiality – when dealing with sensitive data, only those with appropriate authorization can access, modify or use it.
Privacy – refers to the protection of customer data from unauthorized parties.
Availability – an eCommerce site must be accessible 24/7 to customers.
Differences between e-commerce security and compliance Although security and compliance are closely related disciplines, they represent distinct approaches to cyber attacks.
E-commerce security focuses on the ongoing development of effective technical controls to protect your e-commerce site’s assets. In contrast, compliance focuses on third-party requirements, such as industry rules, government policies, and contract terms.
No matter how big your online business idea is, it is important that you also focus on these principles to demonstrate your commitment to digital security by meeting or exceeding industry standards.
As an eCommerce store owner, you will need to meet one or more of these compliance standards:
PCI DSS (Payment Card Industry Data Security Standard) . All companies that process, store or transfer cardholder data must adhere to the security standards established within the PCI-DSS .
SOC (Service Organization Control) . SOC reports show how the company handles financial or personal information. Being SOC compliant ensures that customers protect their information from unauthorized access.
ISO (International Organization for Standardization) . The safety and quality of the products or services of a company’s business are two of the many aspects covered by an ISO certification. ISO 27001 , for example, is one of the standards that define requirements for information security management systems.
GDPR (General Data Protection Regulation). All transactions with European residents must comply with the GDPR. In addition, the regulation protects and controls how European customer data is collected, processed, or sold.
CCPA (California Consumer Privacy Act) . The CCPA focuses on the data protection rights of consumers in the state of California. Therefore, if you sell your trending products to consumers in the state, ensure compliance with the regulations.
The 11 best security measures to protect your e-commerce site Protecting e-commerce sites is a complex issue involving developers, business owners and customers.
Fortunately, there are several best practices and guidelines for improving your site’s overall security.
Protect your passwords. More than 23 million people have had their accounts hacked because they used weak passwords such as “123456,” allowing hackers to crack them in a second.
It is worth the extra effort to ensure that your site and your customers follow the best password guidelines, such as:
Use a combination of symbols, lowercase and uppercase letters, and numbers to form long, unique passwords. Also increase password complexity.
Avoid using the same password for multiple services.
Change passwords occasionally or after your passwords have been accidentally disclosed to other people.
Keep personal information such as date of birth, identification number, or home address just for you.
Set up a reCAPTCHA to make logins even more secure.
Limit login attempts to prevent a malicious user from guessing the user’s password.
Locking accounts after several failed login attempts is an effective way to thwart brute force attacks.
Also, consider using an enterprise password manager such as the one offered by 1Password to keep track of login credentials. You can also use it to generate strong and unique passwords.
In addition, all your passwords are stored in an encrypted format that is difficult to intercept by hackers or malicious software.
Choose secure hosting A hosting provider is responsible for storing your site’s files. Therefore, it is essential to choose a reliable provider that offers secure and reliable data storage for your e-commerce store.
Look for features such as SSL certificates, DDoS protection, encryption methods and malware detection when choosing a hosting provider. In addition, make sure it also offers backups to quickly restore your site’s functionality in the event of a security breach.
Take your time to evaluate which plan best meets the needs of your eCommerce site.
Get an SSL certificate. Setting up Secure Sockets Layer (SSL) is mandatory for all PCI-compliant eCommerce activities. Given the variety of SSL certificates available, be sure to select the best solution for your website and business requirements.
A properly installed SSL certificate helps protect both your site and user data. It encrypts all information sent to your online shop, making it more difficult for hackers to read and interpret the data.
In addition, the website URL will start with HTTPS instead of HTTP once an SSL certificate is installed. The “S” stands for secure, unlike standard HTTP, which does not encrypt connections in the same way as HTTPS websites.
In addition, several browsers will display a padlock icon on the address bar, further increasing customers’ confidence in purchasing from your online shop.
In addition to improving site security, this digital certificate will help improve SEO as Google favors websites that use the HTTPS online protocol.
Install security plugins and anti-malware software. In addition to installing SSL, it is essential for eCommerce sites to add multilevel security tools such as plugins and anti-virus software.
Security plugins. Plugins can perform several tasks to improve eCommerce security, such as detecting bots, blocking untrusted networks, and removing malware.
If you create your online store using a CMS such as WordPress or an eCommerce website builder , below are some of the most popular security plugins:
WordFence . It is probably the most popular WordPress security plugin, with over four million downloads. Using a built-in malware scanner, Wordfence identifies and blocks malicious requests containing suspicious code or content. In addition, it can also restrict login sessions to protect your site from brute force attacks…. Kevy . Instead of entering a username and password, Keyy requires users to log into WordPress using its mobile app. In addition, you can further secure the iOS and Android-compatible app by using your fingerprint or a 4-digit pin as two-factor authentication. Sucuri . Activity control is one of the key features of this read plugin. It provides site owners with the ability to keep track of any changes made. It also includes a feature that allows users to detect malware remotely.
Anti-malware software As e-commerce security measures have become more sophisticated, so have malware attacks. Therefore, it is essential to invest in the right protection for your business.
Below are some well-known anti-malware solutions compatible with Windows, Mac and Linux:
ESET Endpoint Security. Known for its robust and lightweight cybersecurity solutions, ESET helps protect businesses of all sizes from the most advanced cyber attacks. Because it provides a 30-day free trial , small business owners or anyone launching an online shop can try it before investing in a plan.
AVG Antivirus . Protects your site in numerous ways, including instantly notifying users of threats and providing remote administration tools to manage website security. Although AVG does not provide a free trial for the Internet antivirus plan , it offers a 30-day money-back guarantee.
Norton. All its plans include a password manager and a virus protection feature, for which users will receive a full refund if a virus cannot be removed from their device. Norton combines device security, online privacy and identity protection to help detect and block all types of online threats. A free trial is available7-day period that includes comprehensive protection.
Schedule regular site updates. Web developers release new security updates to fix vulnerabilities and launch new fixes. Therefore, updating your eCommerce site’s underlying software is essential to prevent hackers from exploiting these flaws.
Also, always be sure to monitor and update your site’s plugins and themes. Updates usually contain patches to fix previously known problems or add extra functionality.
Keep your website up-to-date by enabling automatic updates. Not only will it save a lot of time on your site’s maintenance routine, but it will also prevent you from running outdated basic software within your website.
Perform regular backups Performing regular website backups helps protect your site from problems such as damaged databases or security issues. Schedule website backups by considering how often you publish new content and update your website design.
Although most hosting providers offer automatic backups, it is a good idea to regularly download copies of your website’s files and database. In case of an unforeseen event, site backups prevent you from losing critical data or having to rebuild everything from scratch.
Add multi-factor authentication (MFA). With this method, users must authenticate their login attempts by entering a single-use passcode (OTP), answering a security question or using their fingerprint.
According to Microsoft , MFA can block more than 99% of possible malware. Therefore, setting up MFA is an excellent strategy to strengthen e-commerce security.
Enable MFA by installing a security plugin such as Wordfence Login Security and a third-party app such as Google Authenticator on your mobile device.
Use a CDN (content delivery network). A CDN is a network of distributed servers that routes users’ requests to servers closest to their locations. This is a great solution for an eCommerce business that operates globally.
In addition, eCommerce websites typically receive high traffic and handle requests from numerous locations. However, if the site takes too long to load , it may cause you to lose customers.
Therefore, by efficiently distributing your site’s content and providing faster response, a reliable CDN provider such as Cloudflare can avoid unexpected spikes in web traffic and server crashes. In addition, since you are likely to store many media files, using a CDN will also improve page load time with features such as image resizing.
Regulate user roles and permissions. Managing user roles is critical for security purposes, regardless of the type of Web site being managed. It is an essential security control practice to prevent any accidental configuration of the site.
By regulating user roles and permissions, you limit who can perform tasks such as installing updates, themes, plugins or modifying PHP code.
For example, WordPress allows site owners to assign six predefined roles to other users. The roles are administrator, editor, author, contributor, subscriber and super administrator. In addition, each role can only perform a specific set of tasks (known as permissions).
Before granting other users access to your website, be sure to keep the following tips in mind:
Provide users with only the access they need. This is a key security measure to prevent users from making unauthorized changes or deleting data without permission.
Limit the number of site administrators. Before granting people administrator access, carefully assess their job functions and whether they are competent enough to perform that type of task. Alternatively, assign them a lower level of access.
Customize user roles and permissions. Download a free plugin such as User Role Editor to customize the activities granted to each user. The plugin is also useful when you need extra hands to control your website or eliminate user access.
Use secure payment gateway A payment gateway authorizes credit card transactions, collects the balance, and then deposits the money into your account.
In other words, it automates the entire eCommerce transaction process. Some recognized examples of payment gateways include PayPal , Google Pay and Apple Pay .
Ensure that the payment gateway of choice uses a variety of security measures to protect transactions, such as:
Data encryption : A payment gateway uses a public key to encrypt a customer’s credit card details. Then, a different (private) key is used to decrypt the information. Along with the private key, the payment gateway also uses an algorithm to ensure that no unauthorized party has access to this data.
Security Sockets Layer (SSL) certificates-required by many providers, it encrypts the connection between the server and the client’s browser.
Secure Electronic Transaction (SET) ensures the secure transfer of a customer’s credit card information during an online purchase. SET prevents merchants and hackers from accessing sensitive information by masking card details. It also requires digital signatures for additional authentication and confidentiality.
Tokenization – replaces a credit card number with random characters. A decryption key is required to keep track of the token. If a breach occurs , hackers will not be able to decrypt the token.
PCI DSS Compliance : A secure payment gateway provides top-notch security measures as it must comply with the highest level of PCI standards.
Avoid storing sensitive data Sensitive information should not become part of a website database. Not only can it be vulnerable to hackers, but it also violates PCI standards. Leave all your customers’ information to the payment gateways.
If necessary, store all confidential data in offline storage such as USB drives or external hard drives where hackers cannot access it. Also make sure it is kept in a secure and private place.
9 most common e-commerce security threats you should avoid A security breach occurs when buyers’ identities and financial details are accessed by unauthorized third parties.
Let’s take a look at some of the most common ways cybercriminals attack your online store.
Financial fraud Although the theft of bank account credentials is commonly known as the main threat behind e-commerce fraud, online criminals are getting more creative these days. The following are financial fraud schemes that online businesses may encounter.
Payment fraud Fraudsters typically use stolen credit card data, e-mail addresses, user accounts or IP addresses to impersonate legitimate customers. Fraudulent purchases, fictitious accounts, and traffic manipulation are all possible outcomes of this type of fraud.
Clean fraud This type of fraud works by tricking cardholders into transacting on a fake website or intercepting messages between transaction participants. Then, the fraudsters will have a copy of the personal information sent. In other cases, credit card details are purchased on the dark web.
Affiliate fraud Many companies participate in or run affiliate marketing programs to generate revenue. Therefore, cybercriminals use these programs as an opportunity to create malicious traffic and sign-ups to induce companies to pay them affiliate commissions.
Triangulation fraud The name refers to the three-step process of luring buyers, collecting their personal information and exploiting it as part of an illegal scheme. Fraudsters create fake websites and promote nonexistent low-cost products. Therefore, once customer data is sent, it automatically ends up in the wrong hands.
Malware Malware (malicious software) is a program or code designed to damage a computer, network or server. It is typically distributed through links to malicious websites or e-mail attachments.
Once a user clicks on the link or opens the file, the malware is activated and begins to execute its intent, such as stealing sensitive data, gaining backdoor access, or spying on the user’s online activity.
The damage caused by malware can be enormous, both in financial and reputational terms. In 2017, the ‘WannaCry malware outbreak infected hundreds of thousands of computers in more than 150 countries and cost the U.K. National Health Service about $113 million.
The malware is classified into different types, such as:
Adware (advertising-supported software) : unwanted advertising that can harm the user’s device. Adware can affect the overall performance of your device as it consumes a lot of RAM.
Trojan horse : unusual behavior, such as unexpected changes to your computer settings, may indicate that a Trojan horse has been downloaded into your system. Typically, it is disguised as an e-mail attachment or free downloadable file.
Malware without files : uses legitimate programs to infect a computer. It does not rely on files and leaves no footprints, making it difficult to detect and remove.
Ransomware : prevents users from accessing their system or personal files. To regain access, they must comply with demands and pay a ransom.
Rootkits : designed to go undetected by antivirus software or other eCommerce security tools so it can look at and access a victim’s computer.
Bots A bot is software programmed to perform tasks more efficiently and quickly than any human could. However, cybercriminals can program bots that simulate human behavior for financial gain and malicious purposes by infiltrating a company’s computers and servers.
A survey reported that in 2020, one in four companies lost $500,000 to bot attacks.
In addition, bots can exploit weak identity and access management (IAM) systems, a digital framework that verifies users’ identities and controls their access. A weak IAM usually cannot distinguish between a real human and a malicious bot.
Social engineering attacks Personal involvement between the fraudster and the victim is a key component of most social engineering attacks. According to one report, more than 30 percent of successful data breaches are the result of such attacks.
Rather than targeting technological vulnerabilities, these attacks target human emotions and behaviors to obtain sensitive information. Thus, it is easy to manipulate the targeted user once they trust the attacker.
Social engineering attacks can be detected in several ways, such as suspicious attachments, poor grammar or formatting of messages, or bland greeting messages.
Let’s take a look at the three most common forms of these malware.
Phishing The main intent of a phishing attack is to steal victims’ credentials. Typically, phishing attackers replicate a real Web server or application and distribute malicious attachments.
In addition, victims can be contacted through e-mails, text messages, or even phone calls.
If the victim is successfully inducted into phishing sites, the scammers can use the credentials sent for anything.
Some recent phishing attacks have involved impersonating e-commerce marketers and telling victims that their accounts had been compromised or that payment discrepancies had been detected.
Quid pro quo Fraudsters pretend to offer information or assistance to the targeted user to gain access to their device or inject malware.
For example, the scammer contacts random individuals and poses as a technical support specialist responding to a problem. If the user believes it, the scammer can have the victim perform specific actions such as installing ransomware on their computers or disclosing sensitive information.
Pretexting In many cases, pretexting scams begin with the attacker claiming to request sensitive information from their target. They pretend to be police officers, colleagues, or bank employers and tell well-conceived lies to persuade the victim to disclose personal information or complete a task.
Spam Spam usually involves sending e-mails to large numbers of users, often employing the tactic of sending “you must act” e-mails. Spam costs companies $20.5 billion a year in lost productivity and technical expenses.
Even your website’s comments section and contact forms are open platforms for spammers to drop infected links that can lead to compromised databases. It can not only damage the security of your website, but also your credibility as an e-commerce business.
In addition, Google may penalize your site for hosting spam comments. This will negatively affect your site’s SEO ranking and even discourage users from ‘interacting with your content.
DoS and DDoS attacks The main goal of both DoS (Denial of Service) and DDoS (Distributed Denial of Service) attacks is to shut down a website. Attackers flood the website with requests from anonymous IP addresses.
A key aspect that differentiates DoS attacks from DDoS attacks is the number of connections used. While the latter uses several Internet connections to disrupt a network or server, the former uses only a single connection. Therefore, it is more difficult to trace the origin of DDoS attacks since they come from multiple locations.
Entrepreneurs should pay special attention to e-commerce security during peak periods, such as Black Friday or Cyber Monday sales. The cost of a DDoS attack can reach $218,000 for a business in the United States.
Brute force tactics Brute force tactics work by simply guessing the credentials needed to access your eCommerce site’s admin panel. Hackers use specialized software to try different combinations of letters, numbers and symbols until they find the correct password.
Once hackers have managed to brute force their way into your website, they gain access to your valuable website database. Sensitive information such as customer identity, bank account details and other confidential data can be stolen or sold for profit.
In 2016, Alibaba-owned eCommerce platform Taobao was the victim of a massive brute force attack that compromised the data of 21 million users. Hackers gained access to accounts by exploiting a database of 99 million passwords and usernames.
E-Skimming E-skimming or a Magecart attack is a hacking technique involving hidden malicious code. The code steals customers’ transaction data as they complete purchases on a hacked site.
In addition, hackers use the captured information to conduct illegal transactions. Online shoppers’ financial details such as full names, card verification codes, and expiration dates are sold on the dark web.
In 2019, a major e-skimming attack hit the website of a famous American department store, Macy’s. The attackers installed a Magecart script on both the homepage and payment page.
Conclusion As cybercriminals are becoming more creative nowadays , e-commerce websites are vulnerable to various approaches, such as malware injection, spam emails, social engineering attacks, and many others.
Implementing proactive solutions against cyber attacks is essential to protect your customers and your business.
To recap, here are 11 steps to keep e-commerce security threats in check:
1.Implement password best practices 2.Choose secure hosting 3.Get an SSL certificate 4.Install security plugins and antivirus software 5.Schedule regular site updates 6.Perform regular backups 7.Add multi-factor authentication 8.Use a CDN 9.Adjust user roles and permissions 10Use a secure payment gateway 11.Avoid storing confidential data
We hope this article has helped you understand the importance of staying current with e-commerce security practices to avoid potential cyber threats.
There was a time when blogging was only about sharing your thoughts online. Now it has become an effective marketing tool that can greatly influence the growth of your business.
A well-structured blog is more than just a side attraction-it can increase your brand visibility, increase conversions and generate revenue. That’s why every business should consider having a blog, especially if growth is its priority.
To give you a better understanding of why a blog is worth considering, here are listed five ways a blog can positively impact your business.
It generates credibility and trust A blog gives you the opportunity to share useful and relevant information from your industry and specifically about your products . It is a great way to keep your customers updated while indirectly promoting your business.
A quality blog can also help distinguish you from your competitors and convince your target market to recognize you as an industry leader. This will automatically create trust and credibility for your brand, growing your e-commerce business.
Although the temptation to focus only on your products will be great, be sure to produce content that does not necessarily include only your brand but tries to address what your target audience is interested in and provide content that answers their questions.
This will make your blog a useful resource rather than an obvious marketing tool, and increase the chances that readers will return and become your customers.
SEO for organic traffic SEO (search engine optimization) is another major reason to create a blog. Search engines rank websites with a quality blog higher in SERPs , increasing the chances of being featured on the first pages of search results.
To make your blog SEO-friendly , be sure to include relevant keywords. Use tools such as Google Analytics to compile a list of keywords relevant to your niche and include them in your content.
Make sure the keywords blend naturally with your content to keep its quality high. Avoid keyword stuffing at all costs, as this will negatively affect your SEO ranking and the quality of your content.
Another way to optimize your blog for search engines is to include internal and external links.
Internal linking means including links within your text that lead to other relevant content on your website such as other blog posts that talk about the topic you mentioned or landing pages that help in the customer journey.
External links are links that link to other reputable websites and other websites that link to you. This link collaboration tells search engines that yours is a reputable website that other credible websites within the same industry trust.
Both types of linking help with SEO, but only if done correctly .
Marketing campaigns. A blog is a great resource to use for a variety of marketing campaigns.
For example, whenever you publish an exceptionally useful blog post, you can set up an email marketing campaign. You can send an e-mail that contains a link and a brief description, with an encouraging message for your readers to come check it out.
You can also use blog posts as content for your social media accounts. If it’s for your Facebook business page, write a brief summary of the article and include a short video, if possible. If it is for Instagram, use relevant hashtags and use a high-quality image.
When it comes to the article itself, include visual elements to break up the text. Colorful images and interesting infographics will not only make your content more exciting, but also attract a larger audience.
A sales funnel When done correctly, a blog can become a sales funnel for your business. Strategically placed CTAs can increase conversion rates and encourage readers to take the desired action.
Blog posts can be used to convert visitors into subscribers, readers into customers, or subtly persuade your audience to share your content with their peers. Whatever your goal, a blog can be an effective tool to achieve it.
It’s free The main reason every entrepreneur should try running a blog is that it costs nothing. So even if it’s not effective and doesn’t bring the results you wanted, you lose nothing but the time you invested.
When it comes to marketing methods, there is no better strategy than free. With that in mind, be sure to first invest some time in learning how to produce content . This way you will greatly increase your chances of success.
Here’s how to get started with a blog The first step in starting a blog is to create a website. To do this you will need two components: web hosting and a domain.
Choose a specific web host in WordPress website hosting, as the CMS is widely considered the best platform for blogs . Make sure it provides sufficient resources, as website performance is critical for a blog to convert.
Some providers such as siteground also include a free domain name registration, so you don’t have to worry about registering one separately. If not, you can always check a domain name registrar and purchase a domain name that suits your brand.
Once you have set up your web hosting and registered a domain name, you can start creating your blog. For more detailed instructions, you can follow our detailed guide on how to create a blog.
Conclusion As you may have guessed, a blog is much more than a place to share your ideas online. It is a powerful marketing tool that, when used correctly, can accelerate the growth of your business .
In summary, a blog can:
Help you build credibility and online presence.
Improve your website’s search engine rankings.
Be used as content for a variety of marketing campaigns.
Act as an effective sales funnel.
If you are ready to see your business expand, start a blog. All it will cost you is time and effort, but it has the potential to bring you much more.
In this article you will learn how to check your domain nameservers and whether they point correctly to your hosting service to prevent DNS problems . You can use WHOIS lookup tools or the system console to check if your domain nameservers are applied correctly and point to the right server.
Let’s get started.
Table of Contents displays. Why check domain nameservers? There are several reasons why you should check your domain nameservers. However, the most common scenario is when you switch to a new hosting provider.
Each hosting service provides its own nameservers For this reason, you should update the nameservers each time you transfer your domain.
Domain migration can jeopardize the accessibility of your website if you have incorrect nameserver details.
How to check nameservers using WHOIS search tools? Here is how to check domain nameservers using WHOIS search tools.
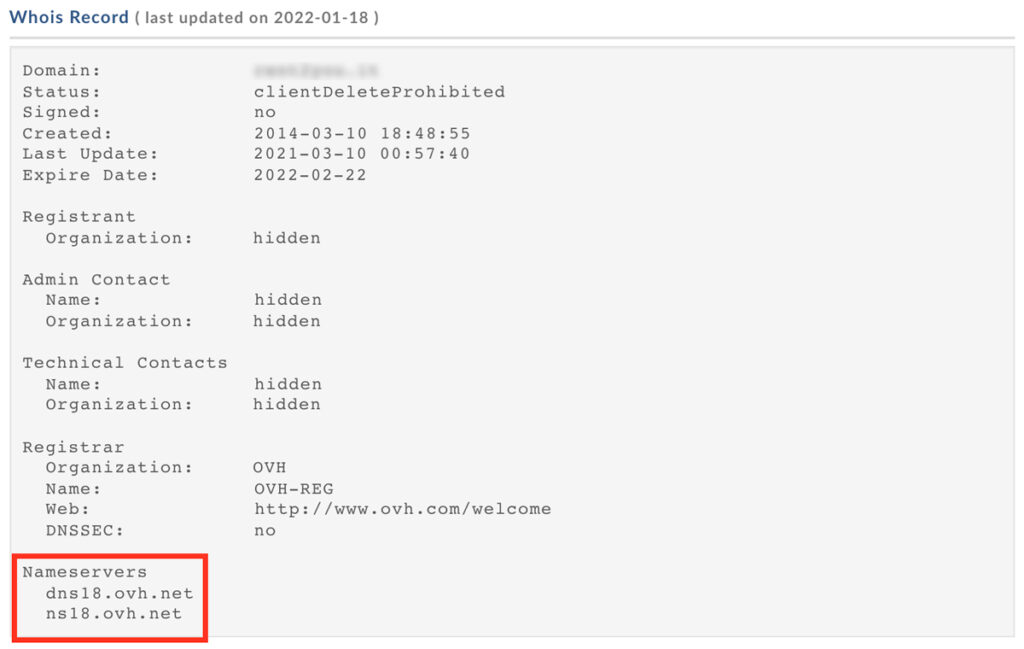
Use the WHOIS lookup tool to find current nameservers. There are many WHOIS search tools available online to help you find your domain nameservers. In this tutorial, we will use Domaintools as an example.
1.Type your domain name in the search box and press the Search icon . 2.The details of your domain should look something like this:
Compare nameservers Next, compare the nameservers you have from your hosting provider and the WHOIS lookup tool. If they show the same details, your domain is set up correctly on your hosting account. If not, contact your hosting company for further assistance.
Also, if you wish to hide contact details from WHOIS, consider turning on domain privacy protection .
How to check nameservers using the system console? We will now show you how to use command prompts to control nameservers on Windows, macOS, and Linux systems .
Windows To do this on Windows , here is how to proceed:
1.Press the Windows + R shortcut command on your keyboard. Type cmd and press OK . 2.You should now see a command prompt window where we will perform the remaining actions from these steps. 3.Type the following command:nslookup -type=ns nomedominio.it Linux To check your nameservers with Linux , follow these steps:
1.Press CTRL + ALT + T to open the terminal window of your Linux computer. 2.Enter the following command:dig ns tuonomedominio.it.
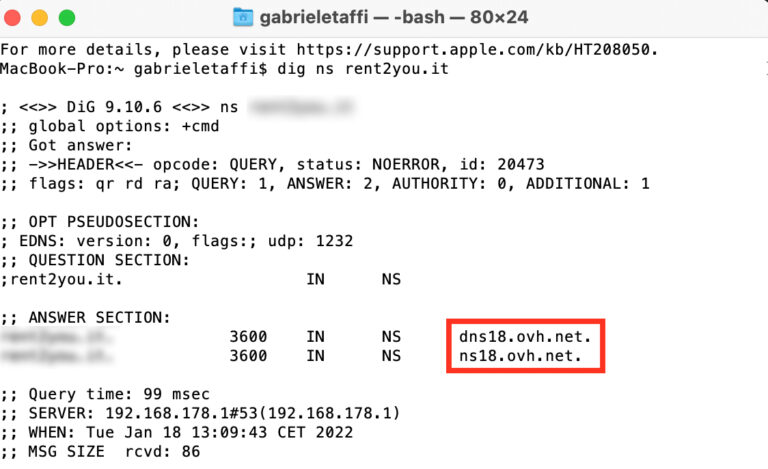
Mac OS Using macOS , here’s what you need to do:
1.Open the macOS Launchpad . This can be done simply by clicking the F4 key .2.In its search field type Terminal and press Enter . 3.Enter the following command:dig ns tuonomedominio.it . 4.You can find the names of the servers in the Answers section.
Common problems when checking nameservers There are some common problems when it is necessary to check nameservers. Here are some examples:
Domain is available for registration If the results show that your domain is available and is not yet registered anywhere, make sure you have entered your site URL correctly. Try copying it directly from your domain registrar.
In addition to this, it is also possible that the WHOIS search tool you use will show you outdated information. This usually happens if you have entered a newly registered domain. In this case, try using a different WHOIS lookup tool.
Nameserver values are not displayed Typically, this problem occurs when less common extensions occur. Make sure that the WHOIS search tool you use supports your domain extension.
Conclusion In this tutorial, you learned how to easily check nameservers using both the system console and online WHOIS lookup tools. Your domain nameservers are working properly if the results match the details in your hosting control panel.
Your WordPress database stores all the important information on your website. However, without maintenance, this storage center can fill up and start slowing down your site . Therefore, optimizing your WordPress database is essential to improve the performance of your website .
Fortunately, there are various methods you can use to optimize your WordPress database. For example, you can manually delete unnecessary and obsolete information using phpMyAdmin. Alternatively, you can use a WordPress database optimization plugin such as WP-Optimize.
In this article, we will provide you with seven tips for optimizing and cleaning up the WordPress database to improve the overall performance of your website. Let’s get started!
Table of contents hide
Use a plugin to optimize your WordPress database
Manually optimize database tables
Eliminate the junk
Remove post revisions
Remove spam comments
Remove unused tags
Eliminate pingbacks and trackbacks Optimize your WordPress database today
Use a plugin to optimize your WordPress database Using a plugin to clean up your WordPress database can drastically reduce your workload. Instead of manually searching through your tables with phpMyAdmin , you can let a reliable tool take the lead. As such, this method is one of the best options if you are a beginner.
We recommend the WP-Optimize plugin, which we will be working with for this tutorial. This tool is an all-in-one solution that you can use to cache, compress images, and optimize your database:
WP-Optimize cleans the WordPress database in several ways, including:
Deleting unnecessary data such as spam comments and transient options
Compacting and defragmenting database tables
Cleaning the database on a scheduled or automated basis
Creating backups of pre-optimization data
Viewing database cleanup statistics
To use WP-Optimize, you must first install and activate it in the WordPress dashboard. Then, go to WP-Optimize > Databases .
You should get to the Optimizations page , where you can select specific items from your database. Then, you can click Run Optimization next to any category of your choice:
If you click on the Tables tab , you can select specific database tables and remove them. The tool will also inform you which of your plugins use these elements. This way, you will know if any of your website functions will be adversely affected by the change:
Finally, the Settings tab allows you to schedule database cleanups. You can choose the frequency of these optimizations and select which data will be deleted:
When you are satisfied with your selections, click Save Settings . The WP-Optimize plugin will now perform regular database cleanups for your WordPress website.
Manually optimize database tables If you want to manually optimize your database, you can do so with the phpMyAdmin tool that gives you access to your WordPress database so you can view, edit and delete tables.
You may prefer this method if you want more control over the WordPress database cleanup process. It might also be attractive if you want to minimize the number of WordPress plugins on your site, for whatever reason.
In any case, we recommend that you back up your database before using this method. Since you will be editing the files manually, there is considerable room for error. Therefore, be careful when proceeding with this option.
With most hosting providers, you can access phpMyAdmin via cPanel :
The exact process will vary depending on your hosting provider. Therefore, you may need to refer to your provider’s official documentation when using this method.
First, open the cPanel dashboard then, scroll down to the DATABASE section and select phpMyAdmin :
You will then be taken to your WordPress website database. Keep in mind that you may need to click on the name of your site to view its contents. The database should look something like this:
Fortunately, it should now be easy to optimize the database tables. At the bottom of the list, check the Select All box . Then, click Optimize Table from the menu that appears:
Finally, select Run. phpMyAdmin will optimize all your tables. When the process is complete, you will receive a confirmation message.
Eliminate the junk You have probably deleted many elements from your WordPress website. For example, you may have removed images, comments, or outdated content.
However, these deleted items do not immediately disappear from the database. They will remain in your website’s trash folder for 30 days. If you regularly delete many items, you might consider emptying the database trash more frequently.
You can easily reduce the duration of deleted items in your database, you just need to edit your wp-config.php file .
Keep in mind that this is a main file for your WordPress website. Therefore, we recommend that you save a backup before making any changes. Next, access your site via File Transfer Protocol (FTP) and open the wp-config.php file with your text editor and add this code snippet to the file:
define( ‘EMPTY_TRASH_DAYS’, X ) Instead of “X,” you will write the number of days before the deleted items are permanently removed from the WordPress database. For example, you might enter “10” for ten days. Then, save the changes and re-upload the modified file to your website.
Remove post revisions. Your WordPress database stores the revisions of all your articles and pages . This collection is useful when you want to restore previous versions of your content or keep track of changes you have made.
However, these revisions can also take up a lot of space in the database. In addition, many posts and pages will contain hundreds of them.
Therefore, you might consider limiting the number of post revisions that WordPress saves. This way, you can make sure that any future posts or pages do not fill up your database.
You will first need to open your wp-config.php file via FTP, then, enter the following code snippet:
define( ‘WP_POST_REVISIONS’, X ); Instead of “X,” enter the number of post revisions you wish to save. For example, you can select “4,” then, save the file and re-upload it to your Web site via FTP.
You can also disable post revisions completely with the following code snippet:
define( ‘WP_POST_REVISIONS’, false ); However, we do not recommend using the second method. If you make mistakes in the future, you won’t have revisions to rely on.
If you want to delete those that are already in your database, we recommend using a plugin such as Optimize Database after Deleting Revisions:
This intuitive tool allows you to delete all your revisions or keep a specified number in your database. The plugin can also perform additional WordPress database cleanup, such as deleting spam comments and unused tags.
Eliminate spam comments Spam comments are very common when you run a website. Spam comments are messages left on your blog posts with links that lead to suspicious or spam websites.
If WordPress or one of your plugins suspects that a comment is spam, it will mark the item for your approval. The post will also be filed under Comments > Spam in the WordPress dashboard.
WordPress will delete these comments automatically after 30 days. In the meantime, they will take up space in your valuable database.
You can easily delete spam comments by selecting them and clicking the Empty Spam button. Alternatively, you can open phpMyAdmin and run the following command:
DELETE FROM wp_comments WHERE comment_approved = ‘spam’ This method might be preferable if you are already using phpMyAdmin for another reason and prefer not to access the WordPress dashboard. Otherwise, it may be unnecessarily complicated.
In addition, some WordPress anti-spam plugins can permanently delete spam comments on your behalf. For example, the Akismet plugin can automatically filter and remove objectionable content from the database without requiring an approval process.
Eliminate unused tags Tags can help organize your website content. When users visit your site, they may click on post tags to find related articles. Therefore, using them can improve your website navigation and overall user experience (UX) .
However, you may have tags that you do not use. For example, you may have changed these tags over time while refining your search engine optimization (SEO) strategy .
In this scenario, unused tags may take up unnecessary space in the WordPress database. If you do not intend to use some tags, it may make sense to delete them.
First, you will need to connect to your database with phpMyAdmin. Then, run this command to see all unused tags in your WordPress database:
SELECT * FROM wp_terms wterms INNER JOIN wp_term_taxonomy wttax ON wterms.term_id = wttax.term_id WHERE wttax.taxonomy = ‘post_tag’ AND wttax.count =0; You will need to change “wp_” to the corresponding prefix in your database. You should then see a list of redundant tags on your website.
Then, run the following command to delete all unused tags:
DELETE FROM wp_terms WHERE term_id IN (SELECT term_id FROM wp_term_taxonomy WHERE count = 0 ); DELETE FROM wp_term_relationships WHERE term_taxonomy_id not IN (SELECT term_taxonomy_id FROM wp_term_taxonomy); Once again, remember that you will need to change the “wp_” prefix to the one used in your database. Your unused tags should now be removed.
Eliminate pingbacks and trackbacks When your website includes a URL to another website, it sends an automatic notification to the server called pingback . This message notifies the other website that you have linked to its content. Similarly, you can manually send trackbacks to convey the same message.
Pingbacks and trackbacks are controversial because some users use them to spam their content on multiple websites. In addition, pingbacks and trackbacks take up unnecessary database space. You may have thousands of sites linking to your website and bloating your database.
To remedy this problem, we recommend that you disable WordPress pingbacks and trackbacks. You can do this by going to Settings> Discussion in WordPress and disabling the first two settings:
Next, you can delete existing trackbacks and pingbacks. To do this, access your database through phpMyAdmin and run this command :
UPDATE wp_posts SET ping_status= “closed”; As always, you will need to swap the “wp_” prefix with the one in your database. Finally, hit Execute to get rid of those pesky pingbacks and trackbacks.
Optimize your WordPress database today. An unoptimized database can slow down your site. This can be frustrating for both you and your users. Therefore, strategies to optimize your WordPress database are essential to increase the performance of your website.
To recap, there are many ways to optimize and clean the WordPress database by manually removing data via phpMyAdmin. However, we recommend using the WP-Optimize plugin instead. This tool can work behind the scenes to keep your website running at its full potential.
Webmaster tools offer various ways to improve search engine optimization (SEO) . They are available through platforms such as Google Search Console , Bing and Yandex . We recommend that you submit your sitemap to Yandex webmaster tools, if you have not already done so. This way you can optimize your website and gain worldwide visibility that you might not otherwise get.
The procedure can be done in 5 steps and in this post we will guide you through the whole process.
Let’s get started!
Table of Contents hide Why submit your XML Sitemap to Yandex webmaster Tools How to submit your XML Sitemap to Yandex webmaster Tools (5 steps) Step 1: Install an SEO plugin to generate your sitemap Step 2: create a Yandex account Step 3: add your website to your Yandex account Step 4: enter the verification code into the WordPress SEO plugin Step 5: submit your XML sitemap Conclusion Why submit your XML Sitemap to Yandex webmaster Tools If you don’t know it yet, Yandex is a popular search engine and web portal based in Russia. Yandex webmaster tools offer various tools that can help you optimize your website and acquire new visitors. These tools include solutions to monitor traffic statistics , improve positions in SERPs, conduct search queries, and more.
Your XML sitemap is a file with all the important pages and files on your website. This essential document informs search engines about all your content. In turn, the search engines “scan” your various URLs using the sitemap as a guide, then index them in the search results pages.
Submitting your XML sitemap and connecting your Yandex webmaster tools can improve your website’s visibility in areas you may not currently target. In addition, you can find out how the search engine crawls your website. Then, you can make valuable improvements to further optimize your website for SEO purposes.
Overall, optimizing your website for SEO is essential for attracting new readers. More than 50 percent of users find websites through organic search. Therefore, increasing the visibility of your website is critical to its sustainability and growth . And while Google may be the default engine for many people, it is not the only important search engine. That’s why we want to help you integrate your site more fully with Yandex.
How to submit your XML Sitemap to Yandex webmaster Tools (5 steps) Now that you’re a little more familiar with what Yandex is and how its webmaster tools can help you, it’s time to go deeper and submit your sitemap to Yandex webmster tools. As we said, it’s easy and can be done in just five simple steps.
Step 1: Install an SEO plugin to generate your sitemap. The first step is to generate your XML siyemap. You can do this with almost any SEO plugin or sitemap . Two of the most popular ones are Yoast SEO and Rank Math SEO . For this tutorial, we will use Rank Math. Anyway, the process will be essentially the same no matter what tool you are using.
If you haven’t already done so, install and activate the plugin on your WordPress site. Then, go to Rank Math > Sitemap Settings .
You can find the link to your XML sitemap at the top of the page. You can also change its settings to display a certain amount of links and images. When you are done, click the Save Changes button at the bottom of the screen.
Step 2: Create a Yandex account. The next step is to create and register an account with Yandex. To get started, go to the Yandex account registration form and fill in the necessary details.
When you are finished, select Register . Please note that you will be asked to provide a cell phone number to verify your identity and receive an SMS code. Once you enter the confirmation code, you can accept the terms of the agreement and complete the registration process.
Step 3: Add your website to your Yandex account. Once your account registration is complete, you will be automatically redirected to the Yandex webmaster tools landing page. Click the yellow Log in button.
The next step is to add the website for which you created the sitemap to your Yandex account. You can do this by clicking on Add site .
Alternatively, you can also click on the + icon at the top of the screen. In the Site Address field , enter the full domain name of your website , then select Add .
You will then be asked to verify the ownership of your website. We will explain this process in the next step.
Step 4: Enter the verification code into the WordPress SEO plugin. After adding your website URL, you should see the website verification screen.
Three options are available for this verification: HTML file , Meta tag or DNS record . The simplest method is Meta tag . (1) Click on the Meta tag tab , then (2) copy the code in quotes.
Go back to your WordPress administration area. Navigate to Rank Math > General Settings> Webmaster Tools .
Scroll down until you locate the Yandex Verification ID field .
Paste the meta tag code into this field, then click the Save Changes button . Now you can go back to the Yandex webmaster dashboard and select the Verify button in the lower right corner.
If everything is successful, you should see a screen with your username. You are now ready to submit your sitemap to Yandex..
Step 5: Submit your XML Sitemap The last step is to submit your XML sitemap to Yandex webmaster tools so that the search engine can start crawling (and ranking) your website. It can take a few days for the Yandex dashboard to start generating and displaying useful data. But once there is enough to aggregate, you can get some meaningful information from these analyses.
Before that can happen, however, you need to add the sitemap so that Yandex can find your pages. From the left menu of the Yandex dashboard, go to (1) Indexing , (2) then Sitemap files . (3) Then enter the URL of your sitemap and click the Add button .
Remember that you can find the link to your sitemap from your SEO plugin. At this point, your sitemap will be placed in a processing queue. It may take a few days to complete, so take note and stop by later to check that everything is OK.
That’s it! In the meantime, you can explore some of the other Yandex webmaster tools, which are quite useful, especially if you haven’t tried them before.
Conclusion Submitting your sitemap to popular search engines other than Google can make it easier for users to find your site. This process is something you probably want to do (or have already done) with Google. Having your site and its content processed by as many search engines as possible, such as Yandex, will help you grow.
As we saw in this post, you can submit your XML sitemap to Yandex webmasters in five simple steps:
1.Use an SEO plugin such as Yoast SEO or Rank Math SEO to generate your XML sitemap in WordPress. 2.Create a Yandex webmaster tools account. 3.Add the website URL to your Yandex account. 4.Verify that you are the owner of the WordPress website. 5.Submit the URL of your XML sitemap to Yandex webmaster tools.