
There are countless ways to make your WordPress site more pleasing in the eyes of your users . One of them is adding custom fonts.
However, the choice of WordPress fonts can be limited and theme-dependent. In this article you will learn how to add custom fonts to WordPress either manually or using plugins.
Table of Contents hide
Where to download fonts for WordPress?
Converting fonts to a web-compatible format
How to add custom fonts to WordPress?
How to manually add fonts to WordPress
How to add fonts in WordPress using plugins
WP Google Fonts
Easy Google Fonts
Use Any Font
Conclusion
Where to download fonts for WordPress?
There are many sites where you can find free web fonts and Font Squirrel is one of them. You can easily find free fonts licensed for commercial work. In addition to that, Google Fonts has over 900 font families and Edge web Fonts, provided by Adobe, offers a large collection of web fonts.
If you are looking for something more suitable for personal use, check out sites such as Fonts.com , Dafont and 1001 free fonts .
Converting fonts to a web-compatible format
It is worth mentioning that not all web browsers support custom fonts. However, even if your chosen font is not supported, you can still convert it to a compatible format.
Before converting sources from one format to another, let’s take a quick look at the different font formats:
- Open Type Fonts (OTF): the most commonly used web fonts and are a registered trademark of Microsoft. This format works well with almost all major browsers.
- True Type Fonts (TTF) – developed by Microsoft and Apple in 1980. Widely used for both Windows and macOS.
- Web Open Font Format (WOFF) – widely used format for web pages and recommended by the World Wide web Consortium (W3C).
- WOFF 2.0 – considered a better option than WOFF 1.0 due to better compression capabilities. This format is not supported by Safari and Internet Explorer, but works well with Google Chrome, Firefox or Opera.
- Embedded OpenType fonts (EOF): more compact fontOTFs used as embedded fonts in web pages. All major browsers support EOF.
If you are not sure if your font is compatible with your default browser, use the Web Font Generator . This tool allows you to easily convert almost any font into a web friendly format:
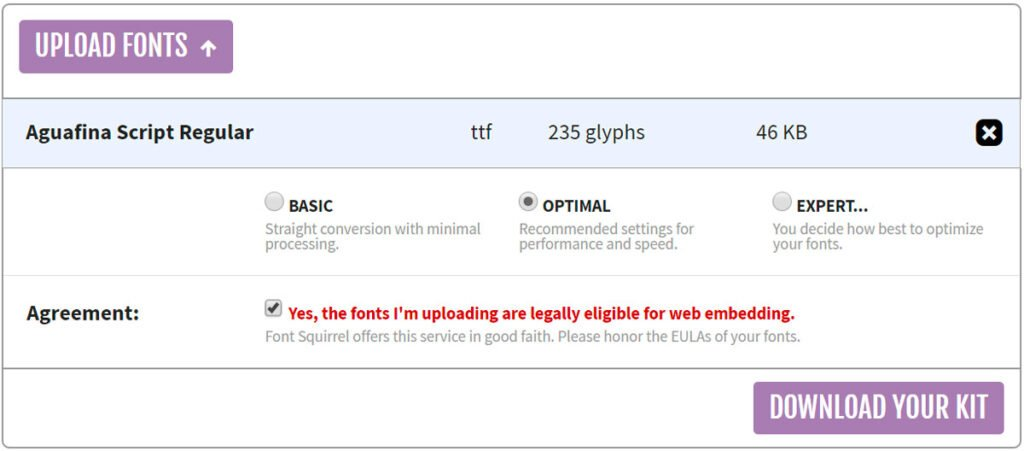
1.Go to webfont Generator .
2.Click the Upload Fonts button and choose a font you want to convert,
Check the box in the Agreement section to indicate that your fonts are legally eligible for web embedding.
3.Press the Download your kit button and save the .zipper archive to your computer.
4.Inside the archive, you will find fonts in WOFF and WOFF 2.0 format along with CSS files and demo HTML page .
How to add custom fonts to WordPress?
Here’s how you can add custom fonts to WordPress, either manually or using plugins.
How to manually add fonts to WordPress
If you don’t want to overload your WordPress with too many plugins, you can manually add fonts to your website. You need to upload your font to your hosting account and edit your theme’s CSS file.
You need to download the font you want to use to your computer and extract the .zipper archive .
Upload your font file to the wp-content/themes/your-theme/fonts directory . Create a separate fonts folder if you don’t have one yet. You can use an FTP client such as FileZilla or cPanel’s File Manager for this task. In our example, we uploaded the font AguafinaScript-Regular.ttf using the File Manager in cPanel.
Go to the WordPress administration area. Then, go to Appearance -> Theme Editor . You will be presented with the style.css file . Scroll down and add the following code:
@font-face {
font-family: aguafina Script-Regular;
src: url(http://test-site.com/wp-content/themes/twentynineteen/fonts/AguafinaScript-Regular.ttf);
font-weight: normal;
}
Don’t forget to change the font family and URL values to match your font.
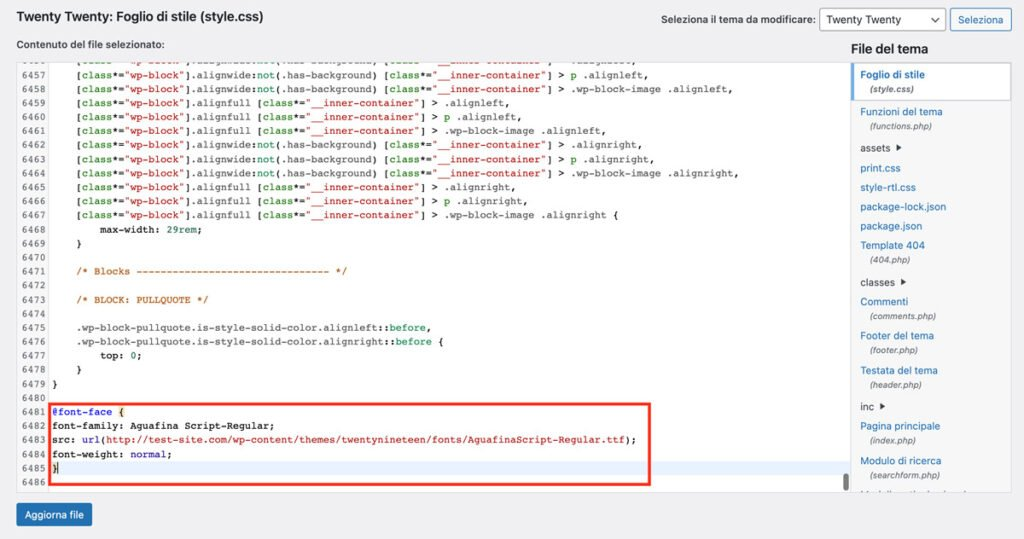
Press the Update File button to save your changes.
Remember, the font-face cidice loads the font every time a visitor visits your website. However, the font is not yet applied to any element.
To assign the font for a specific element, you must edit the same style.css file . For example, the following code would apply the Aguafina Script font to our website title :
.site-title {
font-family: “Aguafina Script-Regular”, Arial, sans-serif;
}
How to add fonts in WordPress using plugins
Using plugins is probably the easiest way for this activity. Here are some of the most well-known and widely used options:

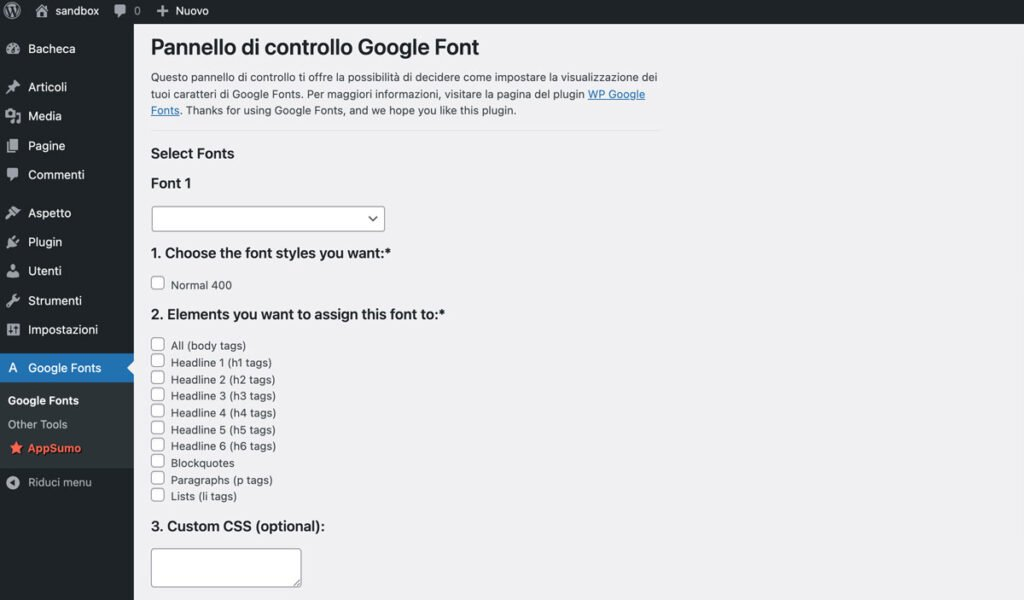
WP Google Fonts gives you the freedom to use custom fonts and apply them to particular CSS elements.
Install the WP Google Fonts plugin from the WordPress plugins directory and open the Google Fonts control panel via the WordPress dashboard. Here you can select fonts and change various settings such as font style, assigned elements, etc.
Easy Google Fonts

With Easy Google Fonts, you can use any theme and preview any font in real time. It is also easy to use since no coding knowledge is required.
Once the plugin is installed and activated, you can edit and manage your font settings by going to Settings -> Google Fonts . If you want to change the typography of your theme right away, access the WordPress customizer by clicking Appearance -> Customize . Next, you can start customizing in the Typography section from where you can manage the fonts for any part of your site.
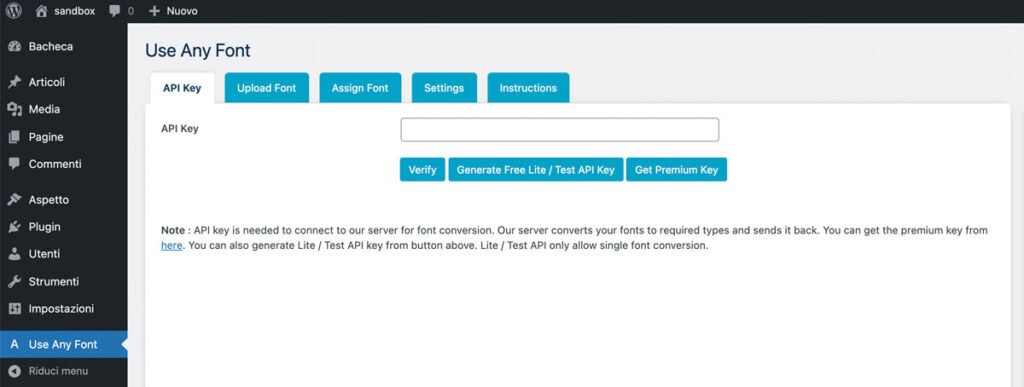
Use Any Font
Use Any Font is another excellent plugin that can help you add different fonts to your WordPress website. Once installed, create a free API key and press the Verify button .
After verification is complete, you will be able to upload fonts in TTF , OTF and WOFF formats . Using another font allows you to assign fonts to custom elements as well.
Conclusion
In this post you learned how to download and convert fonts to a web friendly format. You also discovered two ways to add custom fonts to WordPress. Whichever font you choose, make sure it fits the theme and style of your site.