
A Domain Name System (DNS) is a directory that translates domain names or hostnames into Internet Protocol (IP) addresses . Through this process, users can easily access Web sites on the Internet through Web browsers. Sometimes, some DNS error messages may be detected when accessing a website, one of them being the message “DNS Server not responding” .
This means that the web browser cannot connect to the site because the DNS server cannot correctly map host names to IP addresses.
There are several causes that can generate the DNS Server Not Responding error (or impossible to resolve server dns address.), from incorrectly configured network cards to incorrect DNS server addresses. Fortunately, most of these problems are the user’s responsibility and can be solved without much effort.
This article will examine 11 potential solutions to the error DNS server not responding on Windows and Mac and several common causes for this error message.
Table of contents displays
- DNS server not responding: network troubleshooting
Running network diagnostics is the first step in correcting the “DNS server not responding” error. This method can help test and resolve all detected network problems and errors without too much trouble.
Here is how to run network diagnostics for Windows and Mac computers .
DNS server not responding: run Windows network diagnostics.
Follow the steps below to run network diagnostics on Windows 10:
1.On Windows, go to Control Panel -> Network and Internet -> Network and Sharing Center .
2.Select the Troubleshooting option under Change network settings .
3.Click Additional troubleshooting tools -> Internet connections -> Run the troubleshooting tool .
4.Wait for the troubleshooting process to complete. If a DNS error message appears in the window, follow the steps shown to resolve the problem.
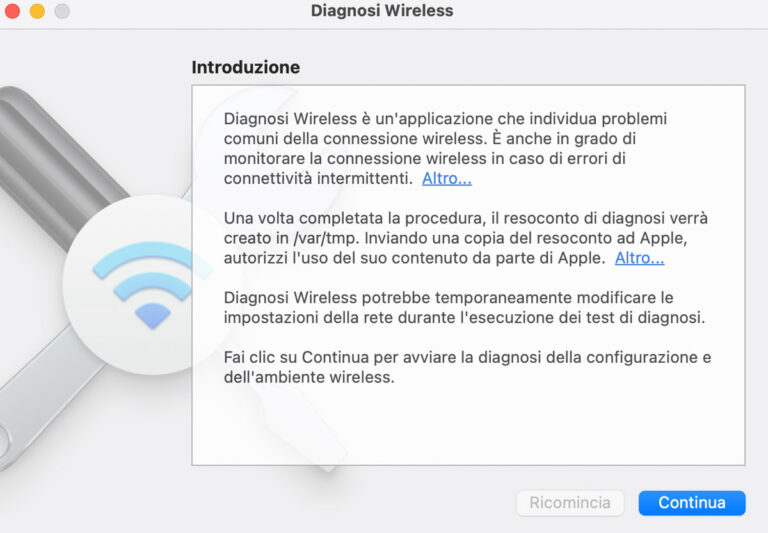
Configure wireless diagnostics on Mac
Here’s how to run wireless diagnostics on macOS:
1.Close all open apps and connect to the network from which you are experiencing the problem.
2.While holding down the Option key , select the Wi-Fi status icon in the menu bar and choose Open wireless diagnostics .
3.Follow the on-screen instructions to examine your network connection.
4.Once the scan process is complete, click on the Information icon in the Summary window to learn more about each item in the list.
If this method does not solve DNS server problems, go to the next step.
- Connect with a different device
Try connecting a different device to the same home network and access the site you are having problems with.
If the second device can access the web page using the same network, the problem is with the primary device.
In any case, if you still can’t visit the Web site with other devices connected to the same network, the problem may be your router.
- Switch to a different web browser
Another simple solution to try when you encounter the problem “DNS server not responding” is to visit the website from a different web browser .
For example, if your main browser is Mozilla Firefox , try accessing the web page from other browsers such as Microsoft Edge and Google Chrome .
If this method works, update the default browser to the latest version or reinstall it completely. Otherwise, if the message “DNS server not responding” is displayed again, the browser is not the source of the connection problem.
- Restart the computer in safe mode
A malfunctioning operating system can cause the error message “DNS server not responding.”
To find out if this problem is preventing the DNS server from responding, you will need to restart the computer in Safe Mode , a reduced version of the operating system that can restrict the files, drivers, and resources used to run the device.
Here are the steps to start a computer in Safe Mode on Windows:
1.Go to the Start menu , select the power button , press the Shift key and select Restart .
2.In the Choose an option window , click Troubleshooting -> Advanced Options .
3.Select the Startup Settings option under Advanced Options and click Restart .
4.Press F5 on the keyboard to select the Safe Mode with Networking option .
If you’re using a Mac, here’s how to start your computer in Safe Mode:
1.Go to the Apple menu -> Shut Down . Wait about 10 seconds after the device shuts down.
2.Turn on the Mac and quickly hold down the Shift key until you see the login screen.
If your network connection is running in safe mode, it means that a third-party software may be causing the “DNS server not responding” problem. To solve this problem, you will have to find and delete the application from your PC.
- Restart the modem or router
A malfunctioning modem or router may also be the cause of DNS not responding.
Therefore, consider restarting your modem or router to clear the cache, potentially solving the DNS server problem.
Press the power button on the router or modem or unplug the power cord from the power outlet. Wait at least 30 seconds before pressing the power button again to reboot.
If restarting the modem or router does not work, try restoring it to its default settings. Check the device’s instruction manual to reset the modem or router.
- Disable antivirus and firewall
Antivirus and firewall programs aim to protect your device from malicious software. However, these tools can also block your Internet connection.
Try temporarily disabling your antivirus and firewall programs to see if they are the cause of the “DNS server not responding” error.
To access antivirus and firewall settings on Windows, select the Start menu and click Settings -> Update and Security -> Windows Security -> Virus and Threat Protection .
If you use a Mac computer, go to System Preferences -> Security and Privacy -> Firewall .

After disabling the antivirus and firewall programs, run network diagnostics again and reopen the Web site from the browser.
If this solves the problem, update or reconfigure the antivirus and firewall programs before reactivating them.
- Disable other connections if the DNS server is not responding
Another solution to solve the “DNS server not responding” problem is to disable unused connections on the device .
Follow these steps to disconnect additional network connections on Windows:
1.Go to Control Panel -> Network and Internet -> Network and Sharing Center .
2.Click Edit Adapter Settings in the left column.
3.The Network Connections page will appear. Right-click Local Network Connection and other connections you are not using and select Disable .
Here’s how to disable other network connections on Mac:
1.Go to the Apple menu -> System Preferences -> Network .
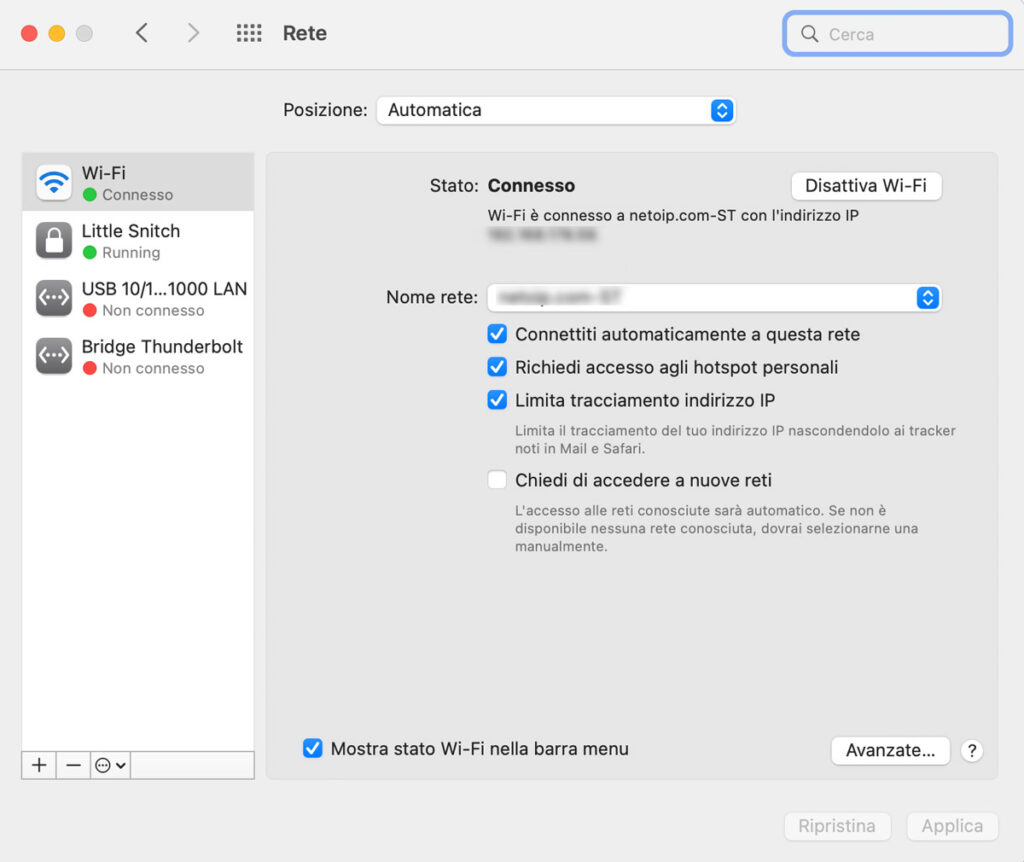
2.
Select each of the unused connections on the left side of the screen and click the minus (-) button to disconnect that connection.
After disabling all unused connections, restart the browser and try accessing the Web site again.
- Change the DNS server address.
If you cannot access the website after the previous solutions, try changing the address of the DNS server .
Your home network is configured to automatically obtain a DNS server address from your Internet service provider (ISP) . However, if your ISP’s DNS server does not respond, your Internet service will also stop working.
To solve this problem temporarily, change your DNS settings and use a different DNS address. This allows your browser to still be able to load any website on the Internet.
Fortunately, many services such as Cloudflare and Google Public DNS offer DNS addresses to use for free.
To configure other DNS servers on Windows, follow these steps:
1.Access the Network Connections page by typing ncpa.cpl in the Windows search box. Press Enter .
2.Right-click the connection currently in use and click Properties .
3.In the Properties window , select Internet Protocol version 4 (TCP/IPv4) -> Properties .
4.Select the options Obtain an IP address automatically and Use the following DNS server addresses on the Internet Protocol version 4 (TCP/IPv4) Properties page .
5.Type the desired DNS server addresses in the Preferred DNS Server and Alternate DNS Server fields .
6.Check the Validate settings on exit box and select OK .
7.Restart your computer.
Here are the steps to change the DNS server address on a Mac:
1.Go to the Apple menu -> System Preferences – > Network .
2.Click on the main network connection and select Advanced -> DNS.
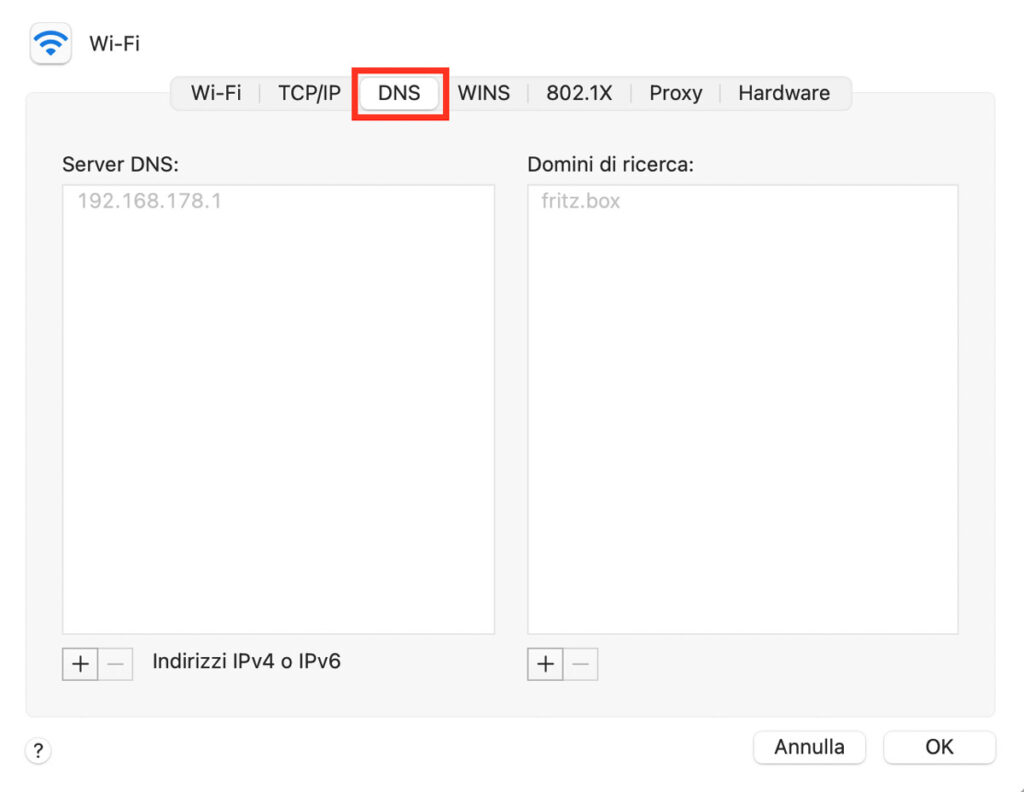
3.Press the plus button to add a new DNS server. Press OK and then Apply .
Restore your Internet connection and see if the “DNS server not responding” problem has been solved.
- Clear the DNS cache
Another solution to solve DNS server connection problems is to clear the cache via a DNS flush . Clearing the router cache may help get DNS working properly.
Here are the steps to clear the DNS cache files on Windows:
Type cmd in Windows search and press Enter to access the Windows command prompt console.
At the command prompt, type ipconfig/flushdns and press Enter .
If the process is successful, a confirmation message will appear at the command prompt.
The steps to clear DNS cache files on a Mac are also relatively simple, but it is critical to run the correct command prompt based on your current version of the operating system.
On your Mac, open Terminal by pressing F4 and entering “terminal” in the Launchpad search box.
Once the app is open, run the appropriate command for your version of macOS.
On macOS Monterey , enter the following command:
1.sudo dscacheutil -flushcache; sudo killall -HUP mDNSResponder
On macOS Big Sur , enter the following command:
2.sudo dscacheutil -flushcache; sudo killall -HUP mDNSResponder
To clear the DNS cache on macOS Catalina , run this in the command prompt:
3.sudo killall -HUP mDNSResponder.
Run this command to clear the DNS cache on macOS Mojave :
sudo killall -HUP mDNSResponder
Clear the DNS cache on macOS High Sierra with this command:
sudo killall -HUP mDNSResponder
For macOS Sierra, Mac OS X El Capitan, X Mavericks, X Mountain Lion, or X Lion , run the following command:
sudo killall -HUP mDNSResponder
If you are using Mac OS X Yosemite , enter this command:
sudo discoveryutil udnsflushcaches
On Mac OS X Snow Leopard , run the command to clear the DNS cache:
sudo dscacheutil -flushcache
If you are using Mac OS X Leopard and earlier versions , enter this command:
sudo lookupd -flushcache
After running the above commands, the network adapter will update its DNS configuration.
Read also: DNS flush: how to clear the DNS cache on various operating systems.